Quick Summary :- In this guide on Angular JS, we dive deeper into this framework and discuss some tips, tricks, and benefits of AngularJS. Besides discussing in detail the controller function, we have discussed the best way to create the base controller in AngularJS. Dig deeper and know more about it.
AngularJS is a structural JavaScript MVC framework. If you are looking to develop dynamic web applications, AngularJS is for you. It was only a project on Google earlier, but now, it is an open-source framework. It is based on JavaScript and HTML, thus eliminating the need to learn one more language or syntax.
You can change static HTML to dynamic HTML with AngularJS. You don’t even have to write a lot of codes, thanks to data binding and dependency injection. AngularJS is an ideal partner with any server technology as the every above action happens within the browser.
AngularJS is considered to be one of the most powerful frameworks in JavaScript. If you have just started with AngularJS, then you are at the absolutely right page.
With so many benefits of using AngularJS, you can also play tricks with this framework. A few of them are listed below:
Tricks With angular.extend()
Before understanding the trick with angular.extend(), you must first understand what exactly it is. For copying object to object, AngularJS has a built-in method called angular.extend(). AngularJS extend controller is considered to be a very powerful function with a plethora of uses.
For your convenience, you can find the documentation for the same here:
https://docs.angularjs.org/api/ng/function/angular.extend
Now you are familiar with the Angular extend controller. It is time to see the tricks. Let us start to understand the tricks with the Angular extend controller by considering a mythical ThingController. It will resemble the use of traditional Angular functions in controllers.
 app.controller(‘ThingController’, [ ‘$scope’, function($scope) {

$scope.thingOne = ‘one’;

$scope.thingTwo = ‘two’;

$scope.getThings = function() {

return $scope.thingOne + ‘ ‘ + $scope.thingTwo;

};

}]);
As you are here to learn and we are here to guide, so we are going to make things easier for you to understand. In effect of this, here for explaining, we are going to give lots of assignments to $scope for building member variables and methods. You can refer below code fragment to understand how it will look if we used Angular extend controllers:
app.controller(‘ThingController’, [ ‘$scope’, function($scope) {

angular.extend($scope, {

thingOne: ‘one’,

thingTwo: ‘two’,

getThings: function() {

return $scope.thingOne + ‘ ‘ + $scope.thingTwo;

}

});

}]);
After this code fragment, here is a tip for you. When you want a cleaner way to express all these assignments to $scope, consider making use of the Angular extend controller.
You may find your models and methods mixed up here in some arbitrary order. But the good part is that you can clean it up. How? Get the guidance from the below code fragment:
app.controller(‘ThingController’, [ ‘$scope’, function($scope) {

// models

angular.extend($scope, {

thingOne: ‘one’,

thingTwo: ‘two’

});
// methods
angular.extend($scope, {
// in HTML template, something like {{ getThings() }}
getThings: function() {
return $scope.thingOne + ‘ ‘ + $scope.thingTwo;
}
});
}]);
Do you want application code to store to thingOne and thingTwo only when values are valid? You can utilize getters & setters and apply private variables for holding the applicable values. You can refer to the below code fragment to understand how.
app.controller(‘ThingController’, [ ‘$scope’, function($scope) {

// private

var _thingOne = ‘one’,

_thingTwo = ‘two’;
// models
angular.extend($scope, {
get thingOne() {
return _thingOne;
},
set thingOne(value) {
if (value !== ‘one’ && value !== ‘two’) {
throw new Error(‘Invalid value (‘+value+‘) for thingOne’);
},
get thingTwo() {
return _thingTwo;
},
set thingTwo(value) {
if (value !== ‘two’ && value !== ‘three’) {
throw new Error(‘Invalid value (‘+value+‘) for thingTwo’);
}
});
// methods
angular.extend($scope, {
// in HTML template, something like {{ things }}
get things() {
return _thingOne + ‘ ‘ + _thingTwo;
}
});
}]);
You can also implement mixins by using the Angular extend controller. For this, take the below contrived logging class into consideration:
var debug = true,

Logger = {

print: function(s) {

return debug ? s : ‘’

}

};
After all of this understanding and executing, we have got one more trick for you to use Angular extend controller. You can try “mixin” the below logger class using Angular extend controller to $scope in numerous controllers. Do you want to understand how? Refer below code:
app.controller(‘ControllerOne’, [ ‘$scope’, function($scope) {

// mixin $scope

angular.extend($scope, Logger);

// define our $scope

angular.extend($scope, {

myVar: 1,

log: function() { this.print(this.myVar); }

});

}]);
app.controller(‘ControllerTwo’, [ ‘$scope’, function($scope) {
// mixin $scope
angular.extend($scope, Logger);
// define our $scope
angular.extend($scope, {
myVar: 2,
log: function() { this.print(this.myVar); }
});
}]);
In a view administered by ControllerOne, you will see {{ log() }} rendering “1” into the DOM, which is the value of myVar. In a view managed by ControllerTwo, you will observe {{ log() }} rendering “2” into the DOM. So you see, we defined mixin for just once and used it twice. Likewise, you can use mixin several times by just creating it for once.
If in case, you are changing the debug variable to false, no value insertion in DOM will take place.
Before you go and try implementing an angular extend controller, here are alarm bells. You may find jquery.extend(), jqlite.extend(), and angular extend controller broken. But you can find the bug report filed for angular extend controller by following the below link:
https://github.com/angular/angular.js/issues/8573.
Understanding Controllers In Angularjs
The more things you see in front of your eyes, the more you get confused. And it becomes more struggling with the things having similarity among them. Similar is the case with controllers in AngularJS, hire angularjs developers to solve complex modern problems of developing dynamic web applications
While creating complicated web applications using multiple controllers, you may find more than one controllers performing similar tasks, but may possess slight differences. To solve the problem of code duplication, you can create a base controller in AngularJS. You can extend the behavior of this base controller in other controllers in AngularJS.
To make you practically understand this concept, we have done below work. Go through the codes and steps to understand how this works.
Creating Controllers in AngularJS
Let’s start creating controllers in AngularJS. Here, we are defining two separate controllers in AngularJS – SimpleCalculatorCtrl and AdvancedCalculatorCtrl.
 angular

.module("myAwesomeApp", [])
.controller(“SimpleCalculatorCtrl”, function() {
var vm = this;
vm.add = add;
vm.subtract = subtract;
function add(a, b) {
vm.result = a + b;
}
function subtract(a, b) {
vm.result = a – b;
}
});
.controller(“AdvancedCalculatorCtrl”, function() {
var vm = this;
vm.add = add;
vm.subtract = subtract;
vm.multiply = multiply;
vm.divide = divide;
function add(a, b) {
vm.result = a + b;
}
function subtract(a, b) {
vm.result = a – b;
}
function multiply(a,b) {
vm.result = a * b;
}
function divide(a, b) {
vm.result = a / b;
}
});
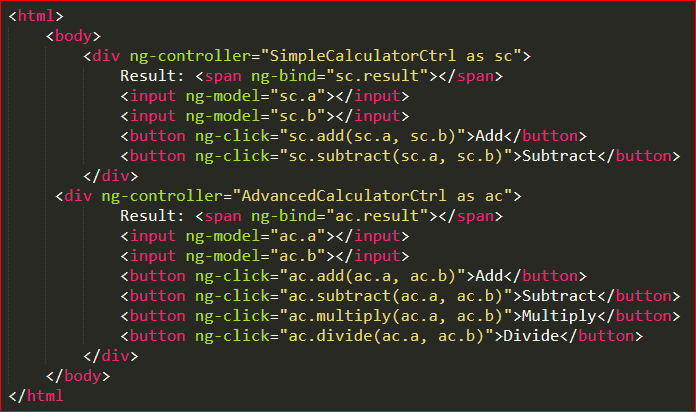
After this brain work, now we are going to use our new controllers in AngularJS. Here we go.
In the above code fragment, you must have seen that AdvancedCalculator and SimpleCalculator both have similar delete and add functions. But AdvancedCalculator has additional multiply and divide functions. If you want to simplify both the controllers in AngularJS, create a CalculatorService. This will watch out the actual logic.
Apart from this, both the controllers in AngularJS, SimpleCalculator and AdvancedCalculator, will also update the result and show the new value on the DOM.
Creating a Base Controller
Now, let us move towards creating a base controller in AngularJS for our calculator controllers. Here, we are going to add the functionalities of both SimpleCalculator and AdvancedCalculator in the base controller in AngularJS.
angular

.module("myAwesomeApp", [])
.controller(“CalculatorCtrl”, function() {
var vm = this;
vm.add = add;
vm.subtract = subtract;
vm.data = {};
function add(a, b) {
vm.data.result = a + b;
}
function subtract(a, b) {
vm.data.result = a – b;
}
});
Extending the Base Controller
You can simplify AdvancedCalculator and SimpleCalculator controllers in AngularJS following the below code:
angular

.module("myAwesomeApp", [])
.controller(“SimpleCalculatorCtrl”, function($scope, $controller) {
var vm = this;
// Inherit from Base Controller
angular.extend(vm, $controller(‘CalculatorCtrl’, {
$scope: $scope
}));
})
.controller(“AdvancedCalculatorCtrl”, function($scope, $controller) {
var vm = this;
// Inherit from Base Controller
angular.extend(vm, $controller(‘CalculatorCtrl’, {
$scope: $scope
}));
vm.multiply = multiply;
vm.divide = divide;
function multiply(a,b) {
vm.data.result = a * b;
}
function divide(a, b) {
vm.data.result = a / b;
}
});
After following the above coding procedure, both the controllers in AngularJS will be free from duplicate codes. This all happened just by extending the base controller in AngularJS, which is CalculatorCtrl.
You can do this by injecting $controller in AngularJS to initialize the base controller. Then you can use Angular extend controller for extending current controller in AngularJS with the base controller.
The result property is moved to the controller in AngularJS into an empty Object, namely data. This is supposed to do because the functionalities of JavaScript doesn’t change the underlying Object itself even after changing the value of a variable.
We would suggest you to implement $controller in AngularJS as it is the simplest way to get your work done. You can also refer to the below example.
This example shows the use of controllers in AngularJS to add and edit diary entries. You will also find in this example a base controller in AngularJS, which contains shared functionality.
A Better Way to Create Base Controller
'use strict';
angular.module(‘Diary’)
// base controller containing common functions for add/edit controllers
.controller(‘Diary.BaseAddEditController’,
[‘$scope’, ‘DiaryService’,
function ($scope, DiaryService) {
$scope.diaryEntry = {};
$scope.saveDiaryEntry = function () {
DiaryService.SaveDiaryEntry($scope.diaryEntry);
};
// add any other shared functionality here.
}])
.controller(‘Diary.AddDiaryController’,
[‘$scope’, ‘$controller’,
function ($scope, $controller) {
// instantiate base controller
$controller(‘Diary.BaseAddEditController’, { $scope: $scope });
}])
.controller(‘Diary.EditDiaryController’,
[‘$scope’, ‘$routeParams’, ‘DiaryService’, ‘$controller’,
function ($scope, $routeParams, DiaryService, $controller) {
// instantiate base controller
$controller(‘Diary.BaseAddEditController’, { $scope: $scope });
DiaryService.GetDiaryEntry($routeParams.id).success(function (data) {
$scope.diaryEntry = data;
});
}]);
You can make the above coding work by building an instance of the base controller in AngularJS and then inject the child controller’s $scope in it. This will add all the properties and methods to the $scope by the base controller in AngularJS, which is available in the child controller and the view.
You may find no sense in the technical Angular controller inheritance in the ‘classical programming’. But this may avert the duplication of code between the controllers in AngularJS.
In below coding, you will find the modified version using “controller as vm” syntax.
AngularJS Base Controller with “Controller as” Syntax
'use strict';
angular.module(‘Diary’)
.controller(‘Diary.BaseAddEditController’, DiaryBaseAddEditController)
.controller(‘Diary.AddController’, DiaryAddController)
.controller(‘Diary.EditController’, DiaryEditController);
// Diary.BaseAddEditController
function DiaryBaseAddEditController(vm, DiaryService) {
vm.diaryEntry = { name: ‘default diary entry from Diary.BaseAddEditController’ };
vm.saveDiaryEntry = function () {
DiaryService.SaveDiaryEntry(vm.diaryEntry);
};
// add any other shared functionality here.
}
// Diary.AddController
function DiaryAddController($controller) {
var vm = this;
// instantiate base controller
$controller(‘Diary.BaseAddEditController’, { vm: vm });
}
// Diary.EditController
function DiaryEditController($routeParams, DiaryService, $controller) {
var vm = this;
// instantiate base controller
$controller(‘Diary.BaseAddEditController’, { vm: vm });
DiaryService.GetDiaryEntry($routeParams.id).success(function (data) {
vm.diaryEntry = data;
});
}
Conclusion
After all this juggling and picking, you got the complete guide to AngularJS. Now you are familiar with the controllers, AngularJS extend controller, base controllers, and the tricks that you can do using them. Now it’s your turn to do some brainstorming and show your creativity. Who knows if you will come up with the most innovative idea yet in the market?
We would appreciate you to do some brain work, using above references, and implement your ideas to get extraordinary results. In case you need assistance, you can consult Angular Development company anytime to do some magic with AngularJS.


