With the evolution of several JavaScript frameworks, now iPhone applications can also be made using JavaScript while maintaining a native app experience. Today, we’re going to shift our focus on building iMessage Extension with React Native.
Here is a step-by-step guide to building iMessage extensions for yourself or for your clients.
After going through this article, you can create an effective iMessage Extension on your own.
So, without further ado, let’s dive straight in.
Steps to develop iMessage Extension With React Native
Step 1: Install React Native in Your System
This is the essential step that you need to follow to iMessage Extension with React Native because you will need the framework installed in your system, that you are going to use to write your code and test your project.
To install a React Native in your system, you have to write the code mentioned below.
$ npm install -g React Native-cli
If you find any issue with this process, then you can hire react native developer india. They will guide you better on this subject.
Step 2: Create a Project
This will install the cross-platform JavaScript framework for your system. Then, you will need a project created in your order where you will store your code. Let’s create one plan using the below code.
$ React Native init iMessageExtensionProject
Step 3: Create Root on React Native
Then we go to Xcode to edit some of the files and options as per our needs. We are going to add a target for our Xcode project, which is going to build the iMessage extension. For this purpose, you need to have an idea about the Core Concept Of React.
- An open iOS project with XCode
- Then go to File > New > Target Menu
- Click on the iMessage extension icon
- Then you can create the name of your iMessage extension and get things started.
After that, you need to create root on the React Native side for your iMessage extension. Below is the code that you can write to establish the root on the React Native side.
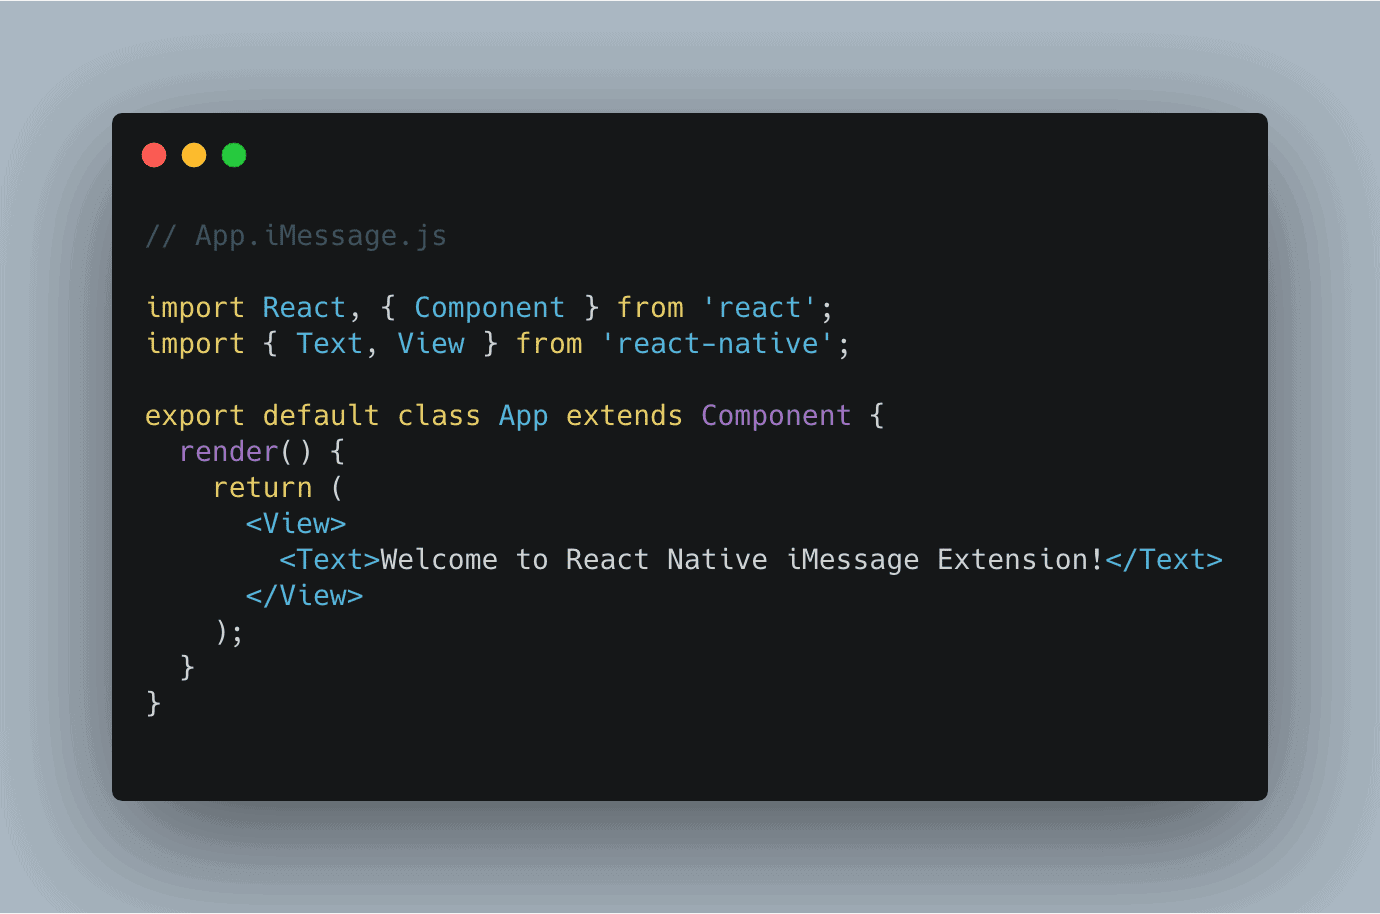
You also need to make this component accessible for our subsequent steps and to do that we also have to create another file in the project root. This file will make the file accessible to the React Native side of the main application.
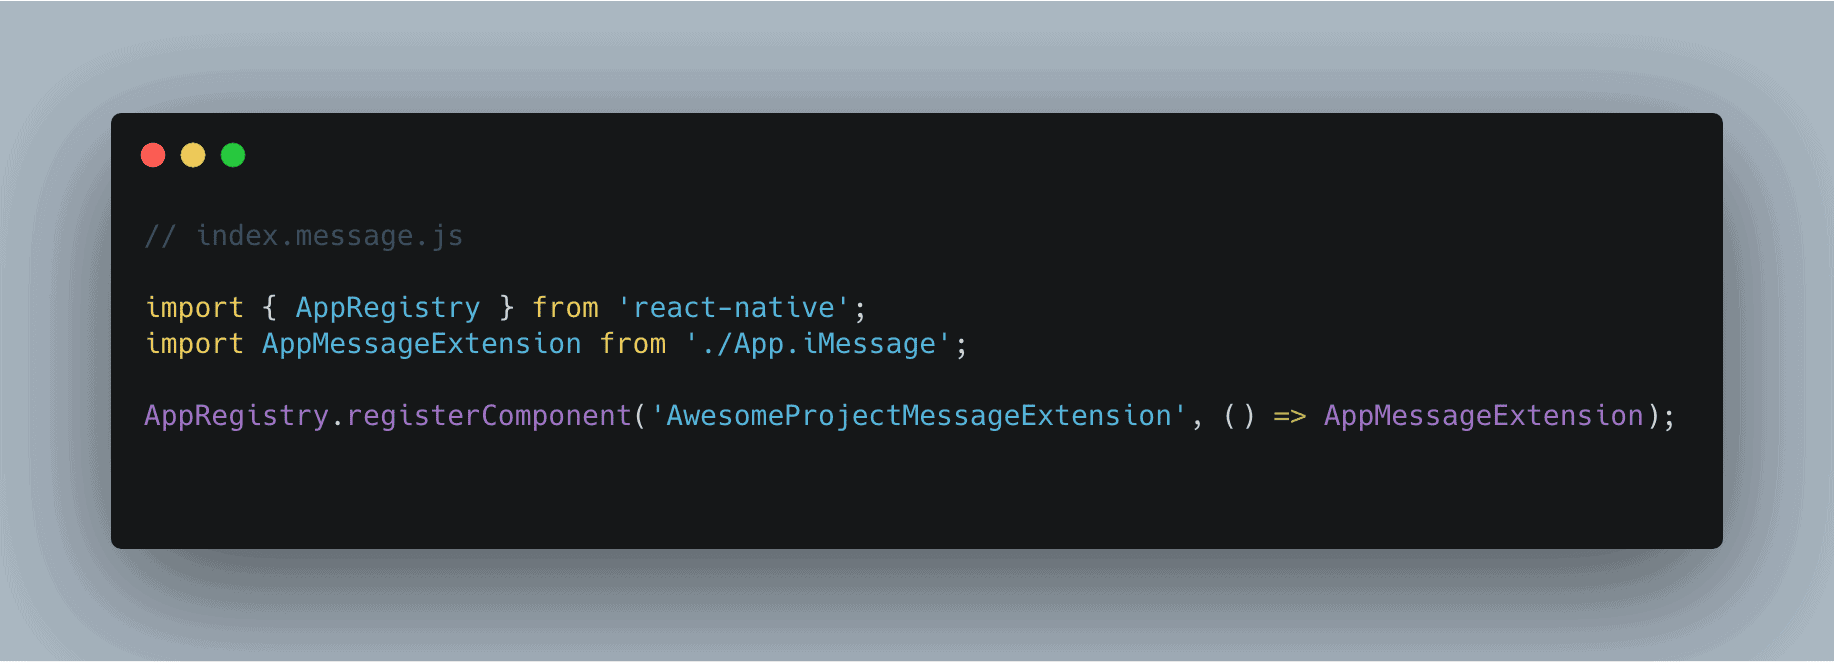
Step 4: Connect iMessage Extension with React Native
React Native is not the native language which is used for creating official iPhone applications. So, you have to ensure that your React Native code is rendered properly at the iMessage target.
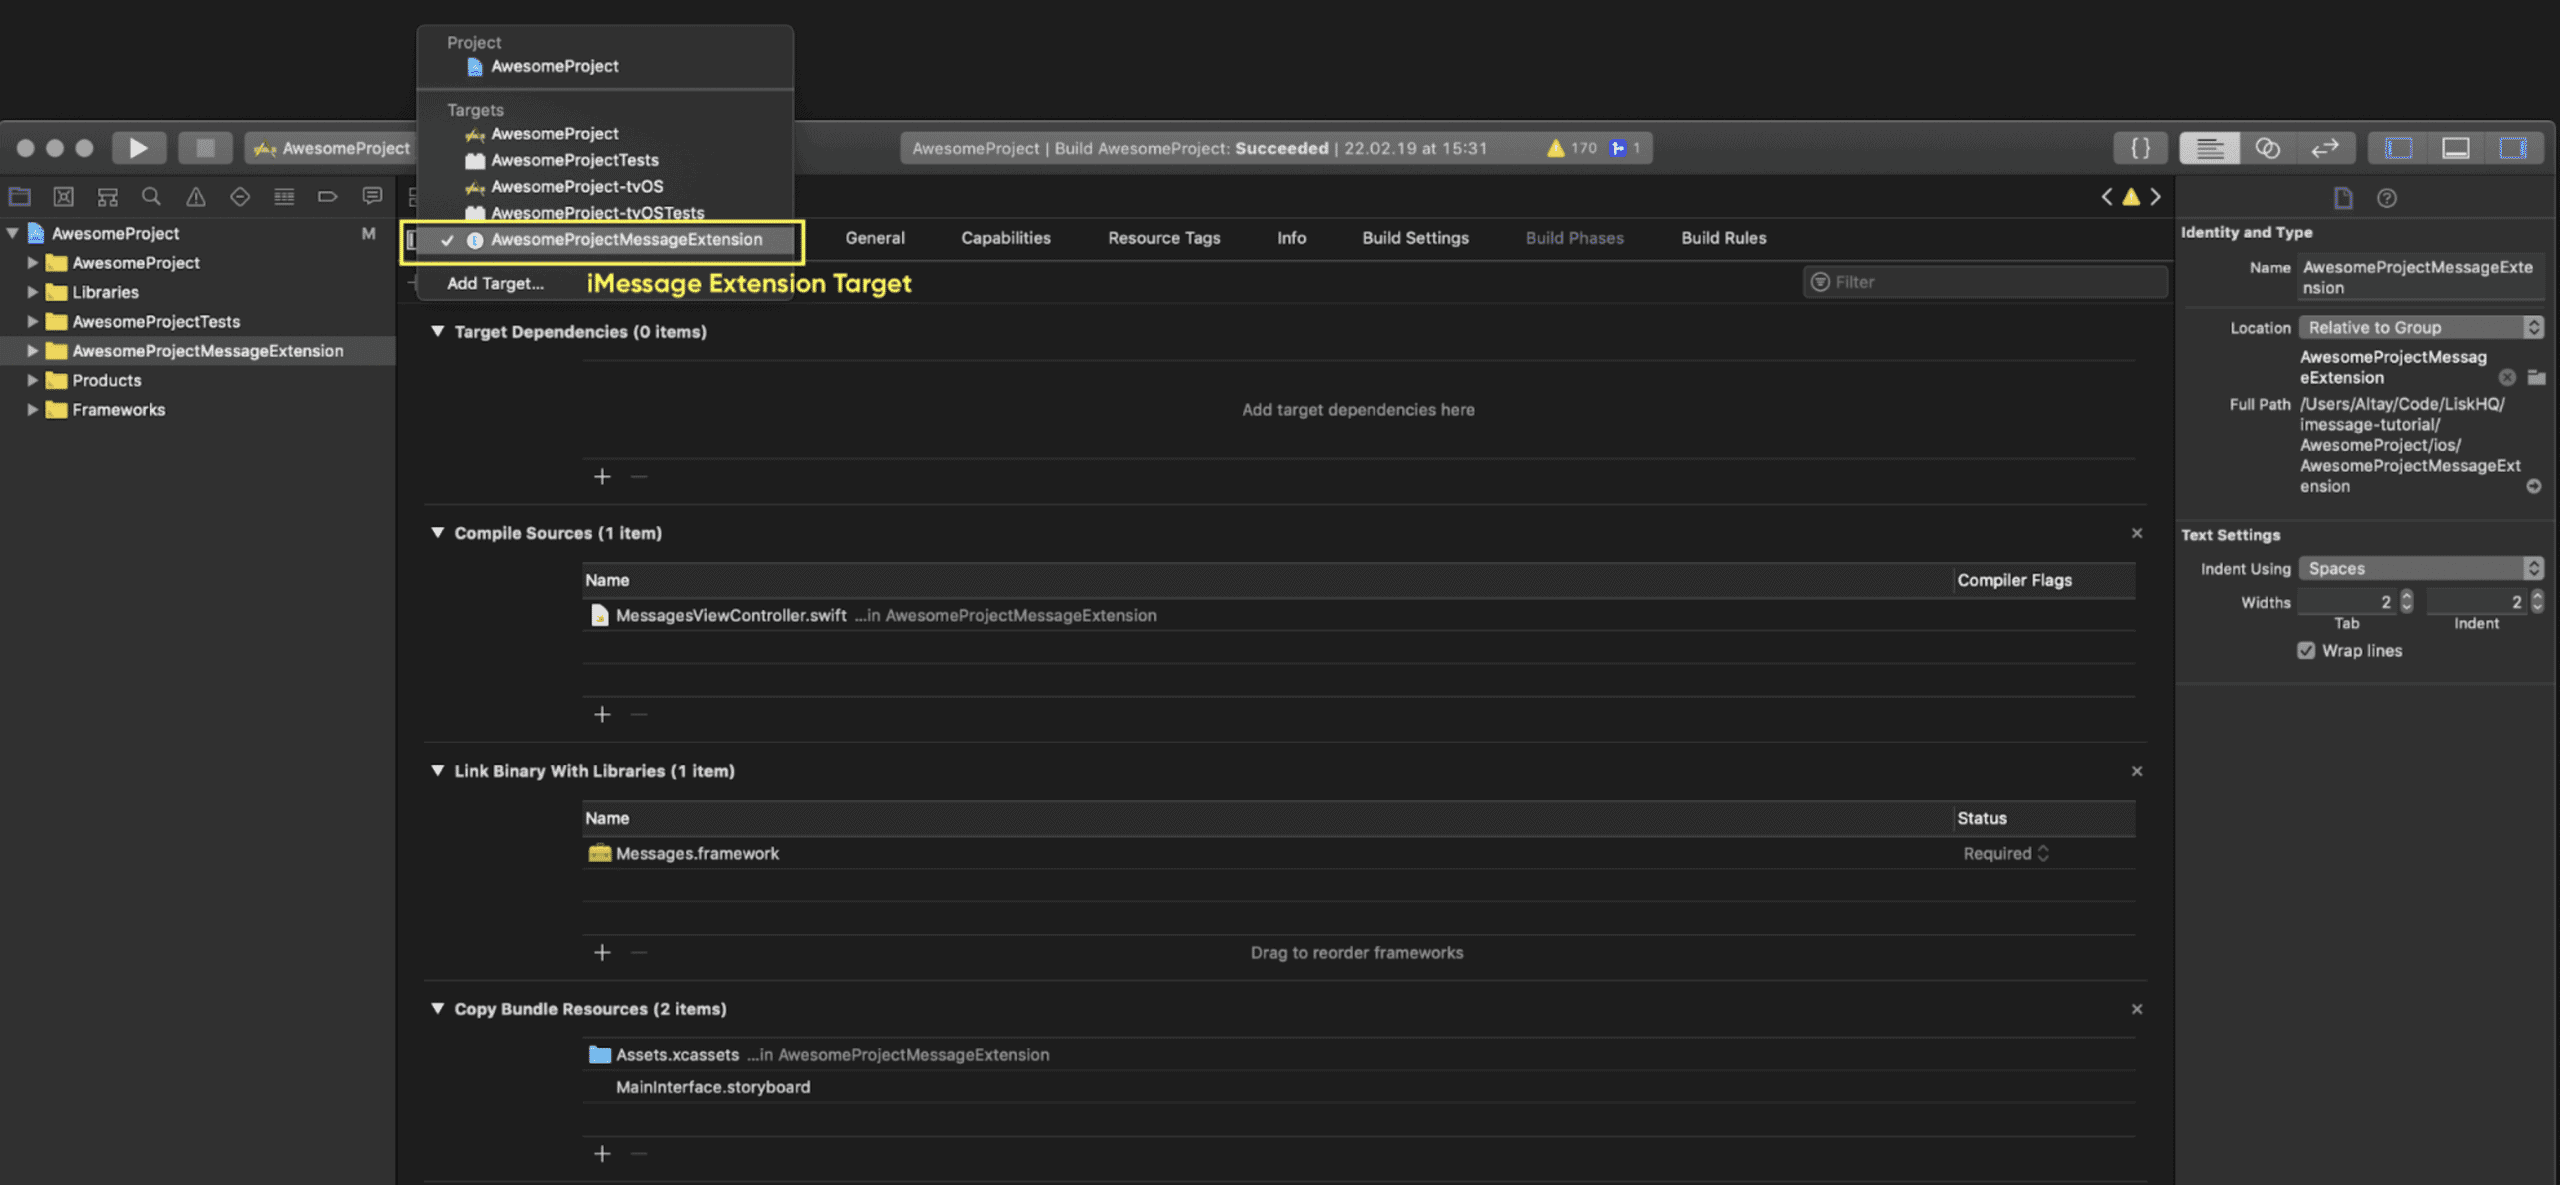
Now we will create a phase configuration of the primary application.
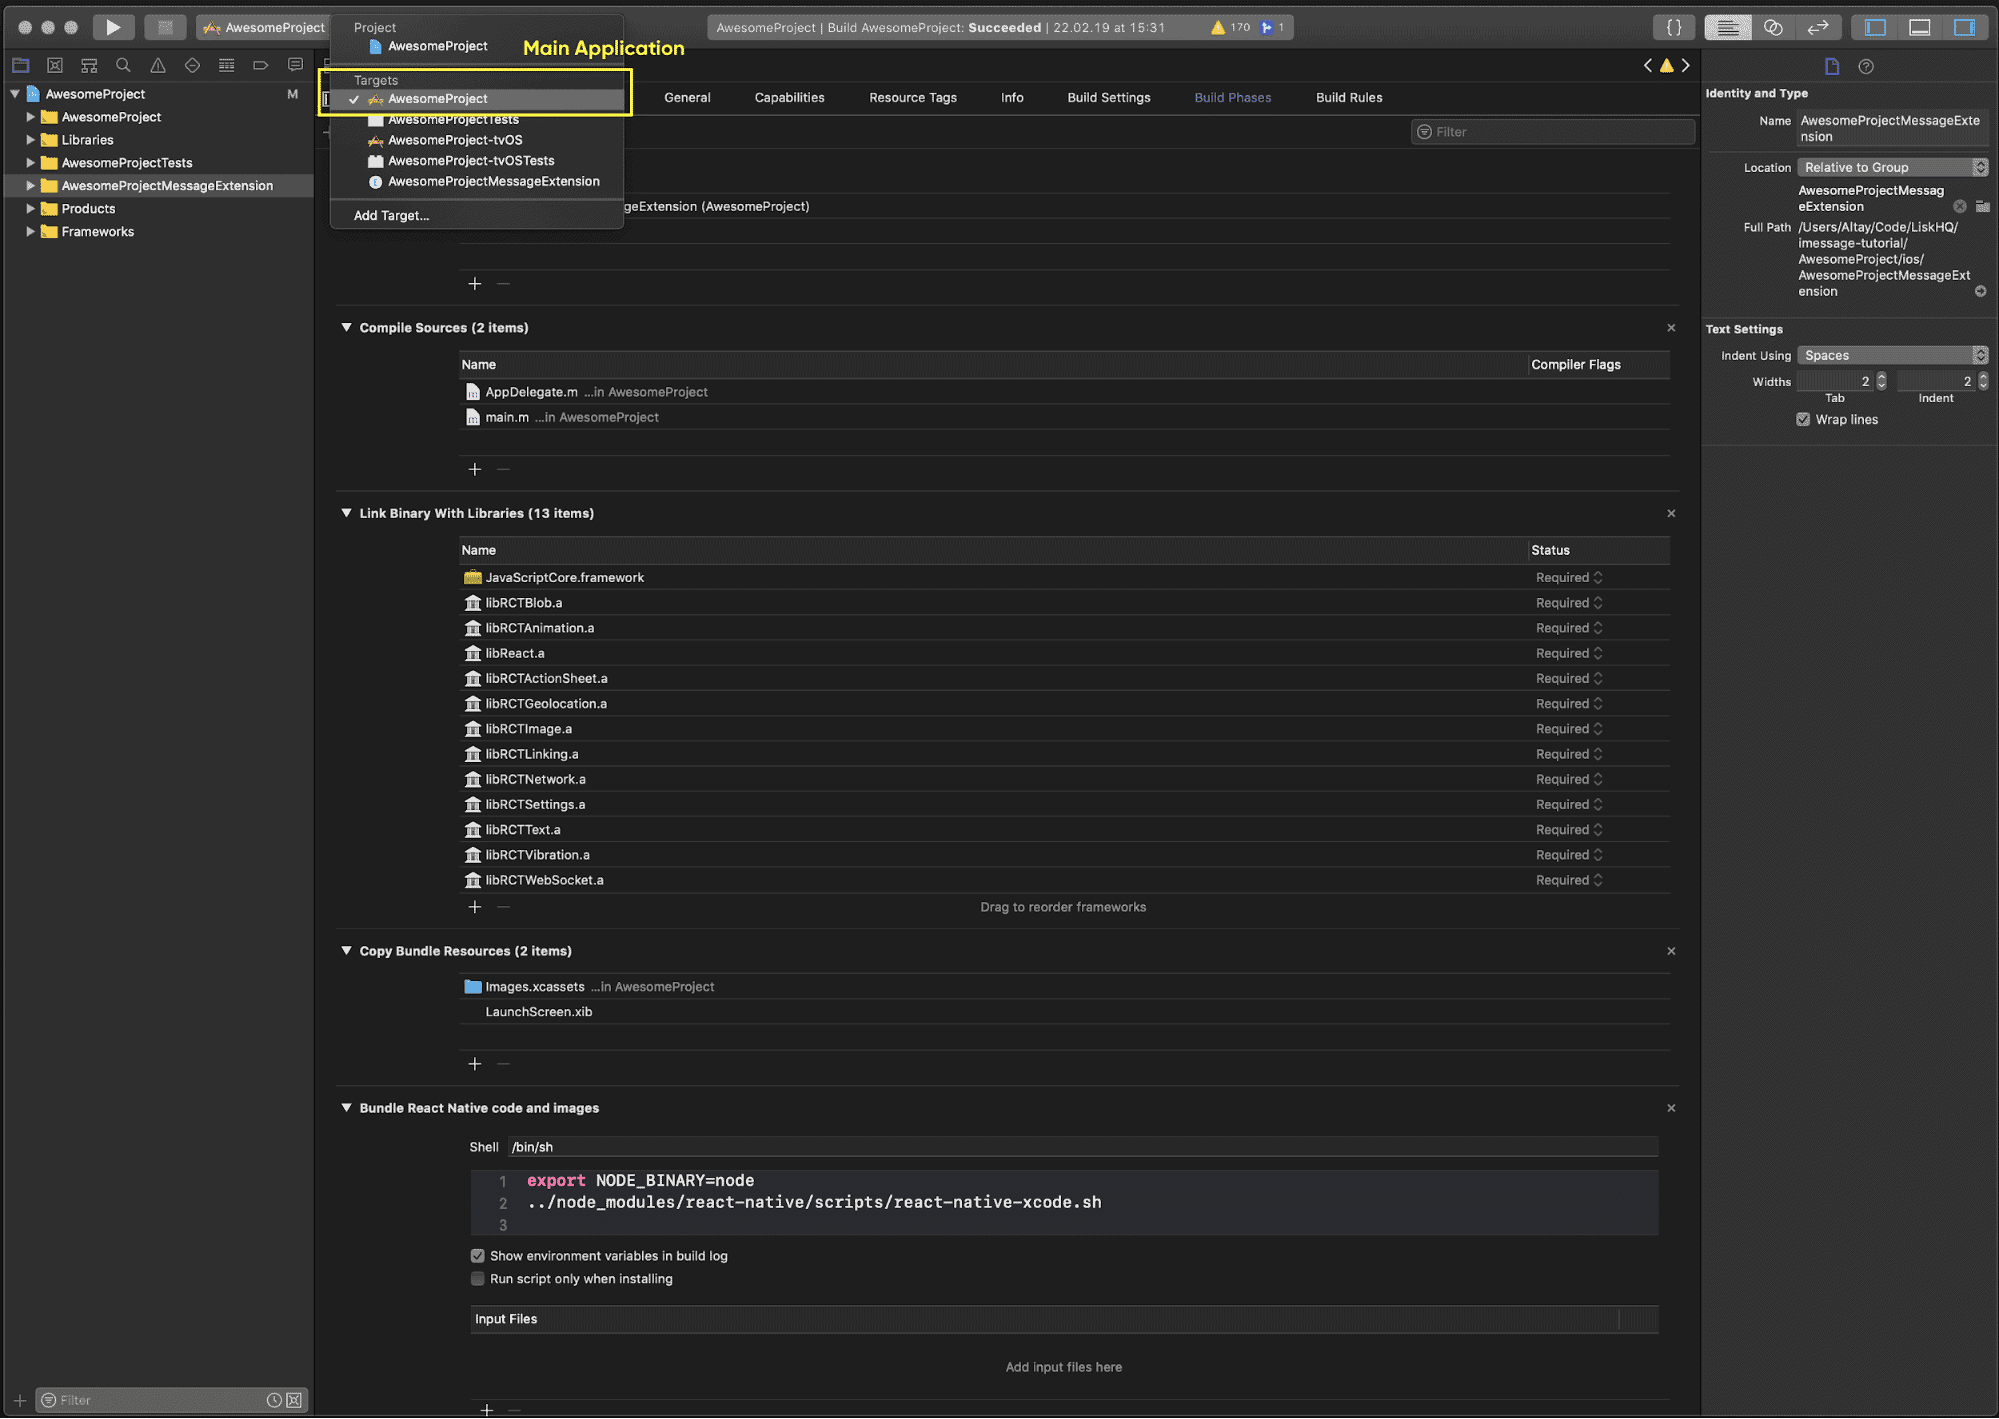
Create phase configuration for the target of iMessage Extension
Step 5: Connect Libraries
For iMessage Extension with React Native, you will need all libraries in one place. You have to link these libraries in order to ensure a smoother execution. If you cannot do this correctly, the extension would not be supported at the users’ end.
Since we are only creating the basic extension, these libraries are the React’s basic libraries only. This is one of the best ways to Speed Up Your React Front-End App.
Please note that if you are using any third-party libraries for building an iMessage extension, link them here as well.
Now, link the binary with libraries to the configuration of iMessage Extension Target

Once you get the libraries, do the following.

Step 6: Build Bridge Header File for Swift
We are done with the basic setup for your iMessage extension, now it’s time to create a bridge header file that is comprehensible to the swift compiler.
Please understand that the library files which we have selected in the previous step are built using Objective-C which is not comprehensible to Apple’s operating system.
So, it is crucial that we create a bridge for connecting libraries with Swift programming language which is the native language of iOS.
Now, we will create a header file with the name Bridging-Header.h Inside our project folder.
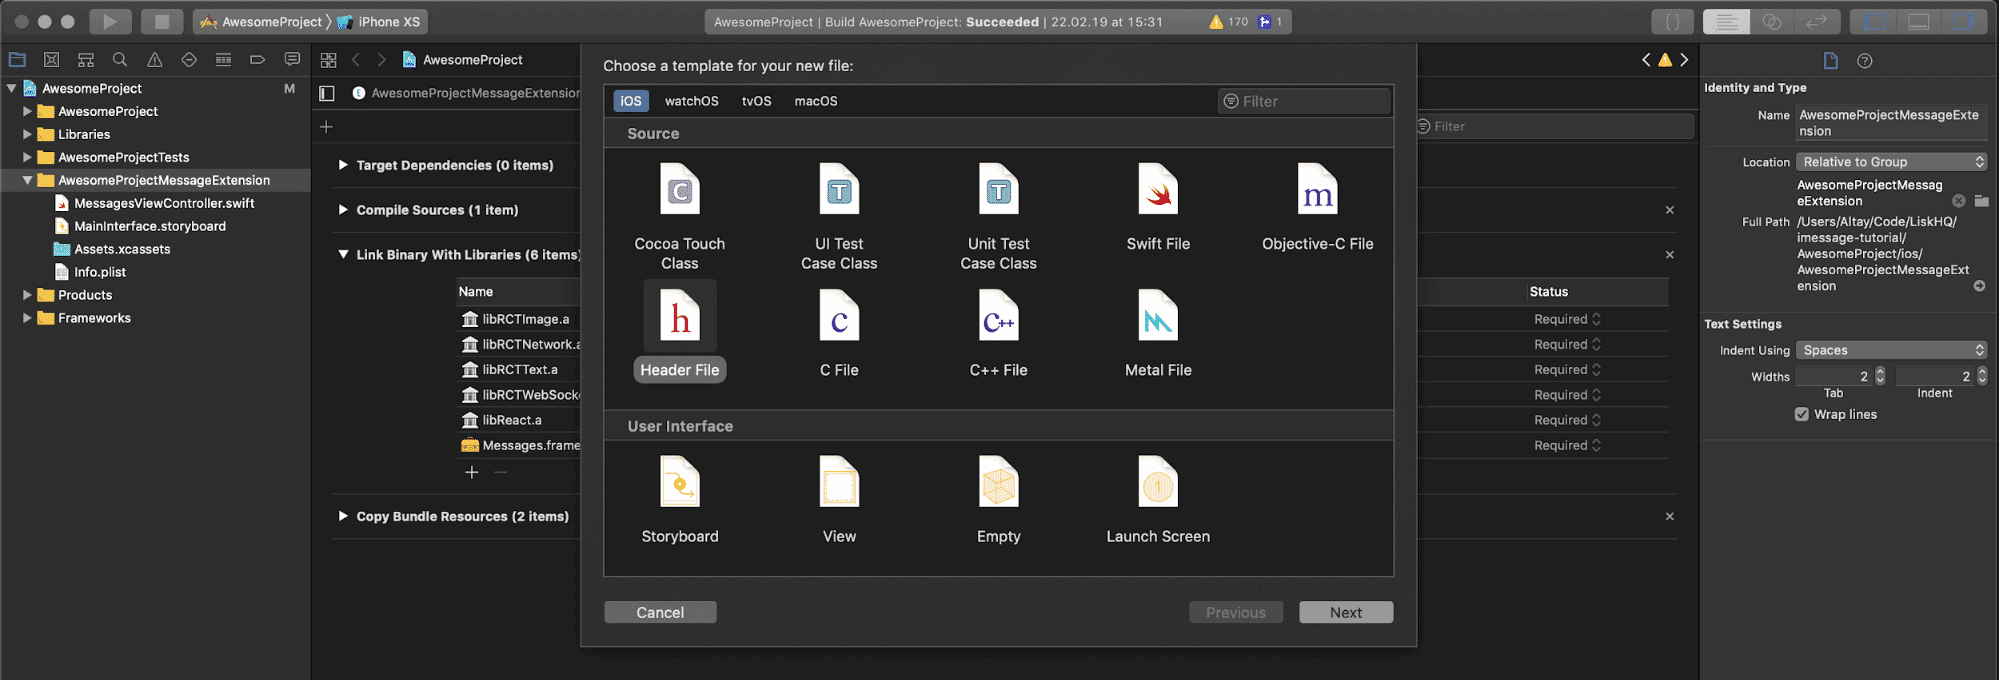
Also, configure the header file like below.
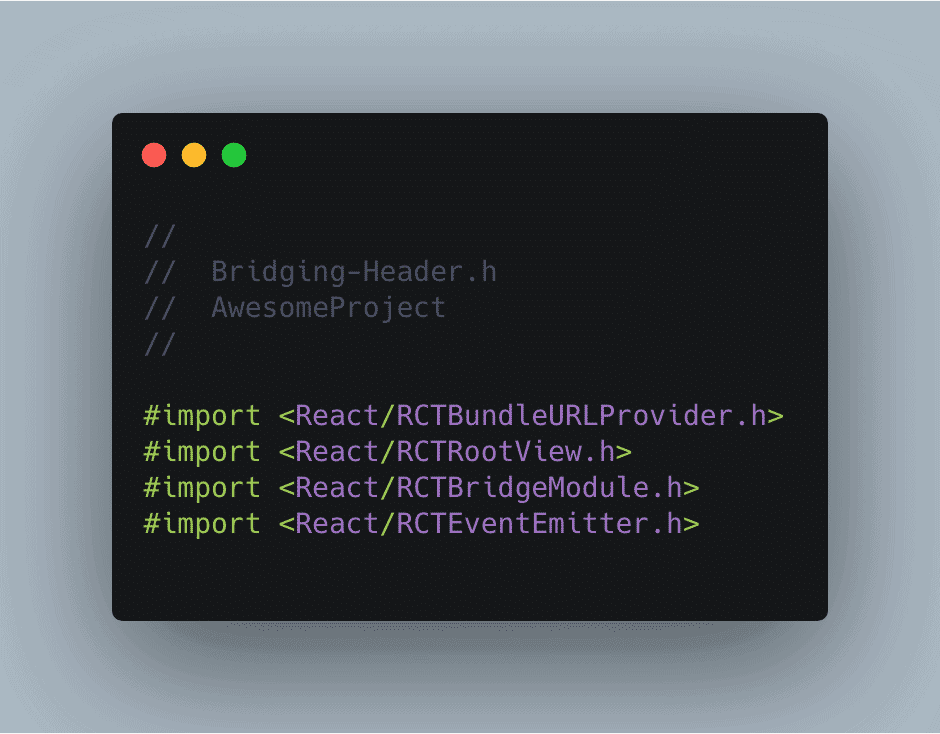
Then, go to Swift Compiler > General and click on Objective-C Bridging Header from the XCode configuration.

Step 7: Build Configuration and Update Project
First, you need to update the info.plist file which is always present in an iPhone application development project.
For ensuring that our App Performance is optimum, we need to connect the loading content from the localhost as shown in the image below.

Now, add Build Phase for iMessage Extension, as shown in the image below. If you feel that there is any problem with this step, then contact & Hire React Native Developers.

Step 8: Work with Initial Render and RTC Bridge
We have already registered the application in the ‘Create iMessage Root on React Native Side’ area. Now, we will focus on the areas like RCTRootView to load the iMessage code inside the react-native side.
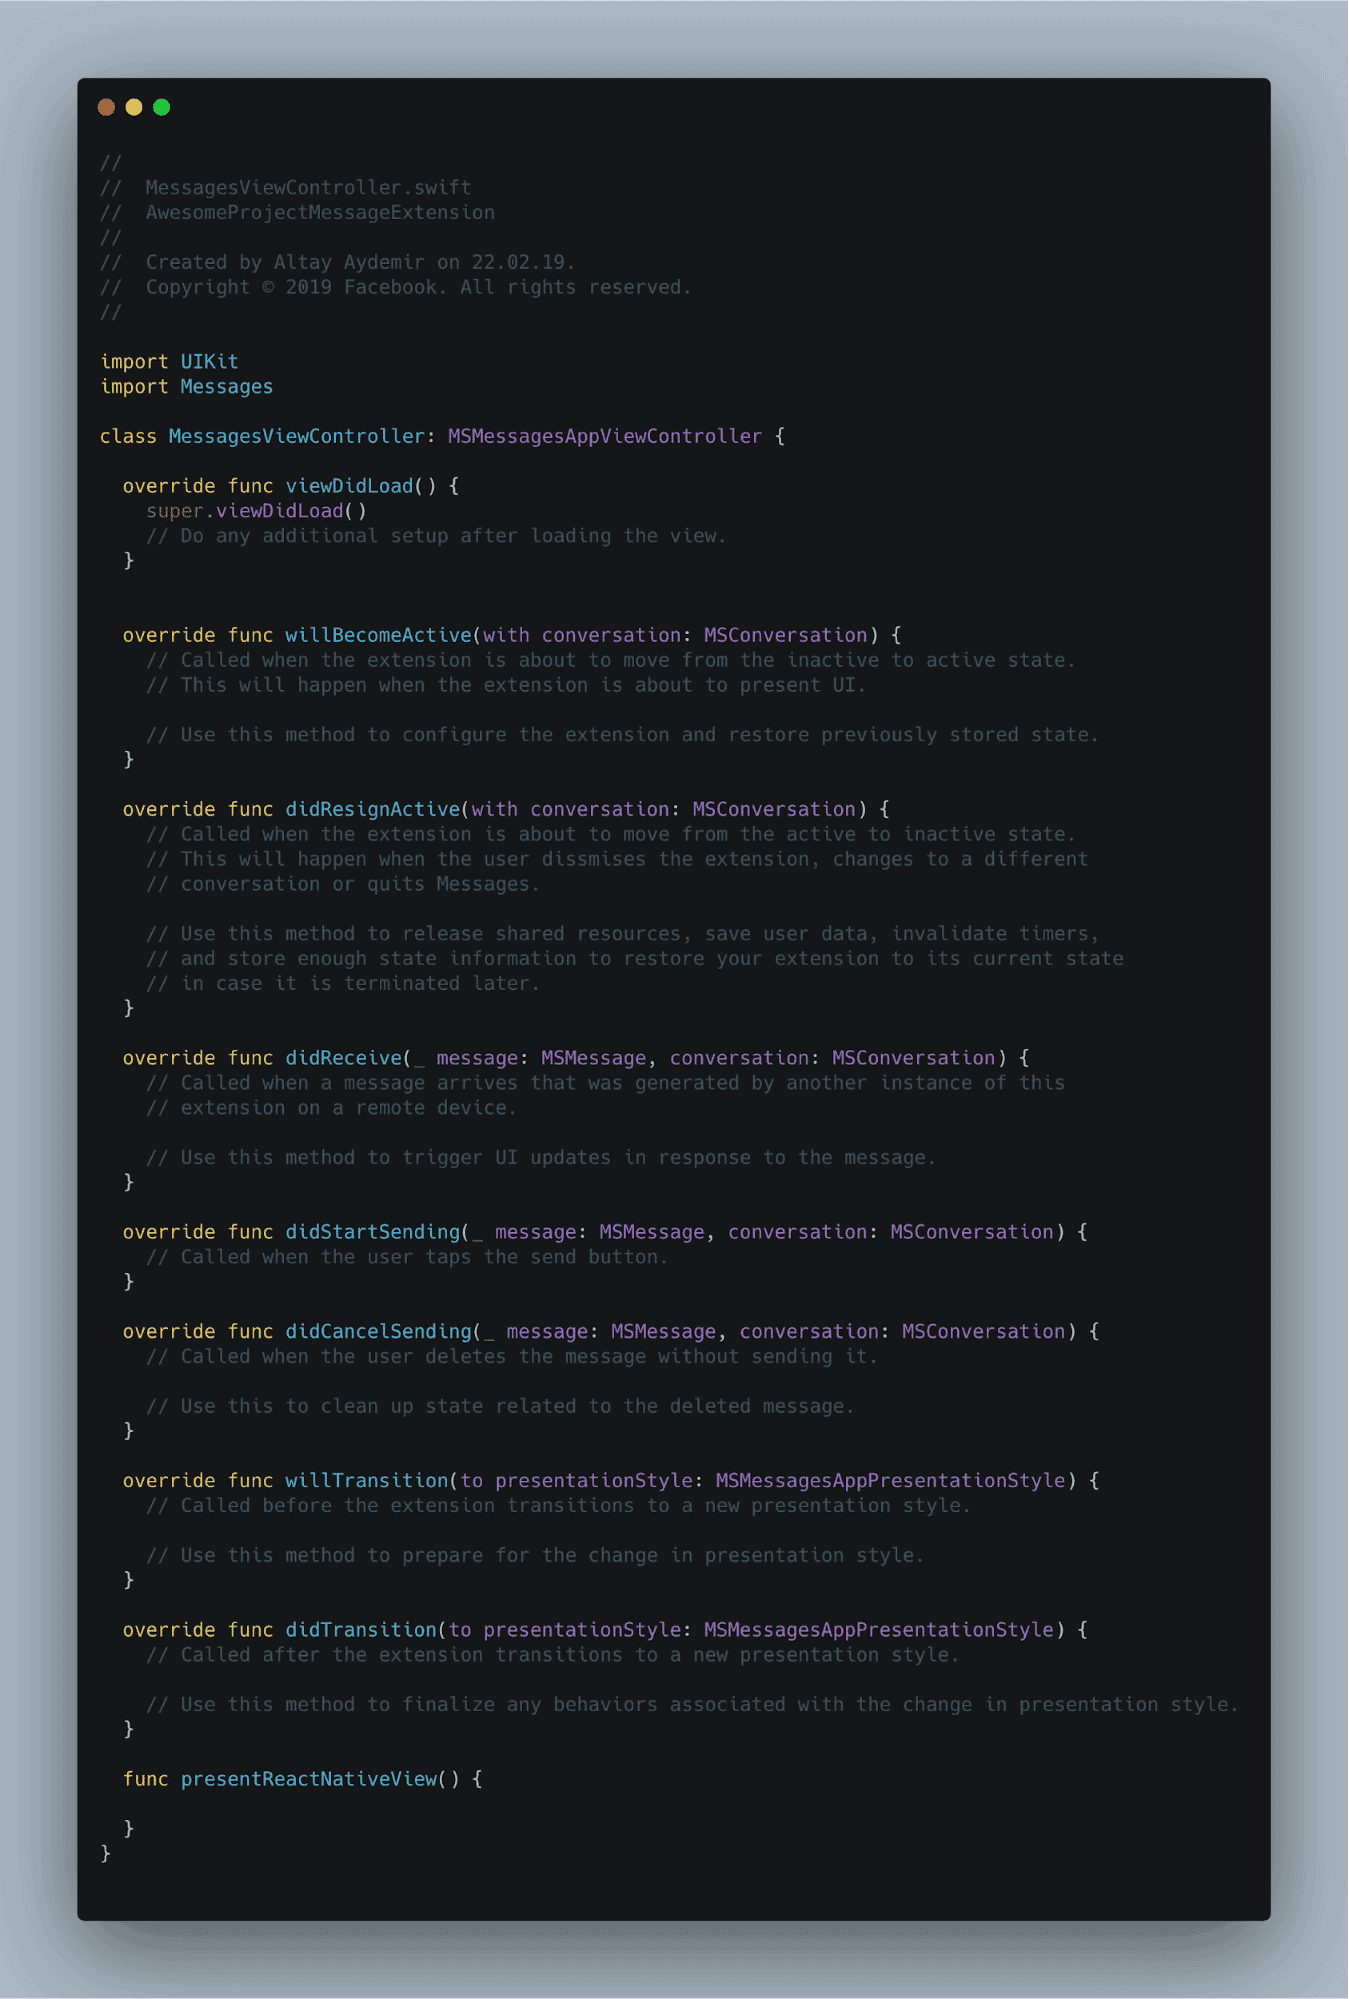
We begin tweaking our MessagesViewController.swift to create an RCTBridge, RCTRootView and render our registered AwesomeProjectMessageExtension module within that view.
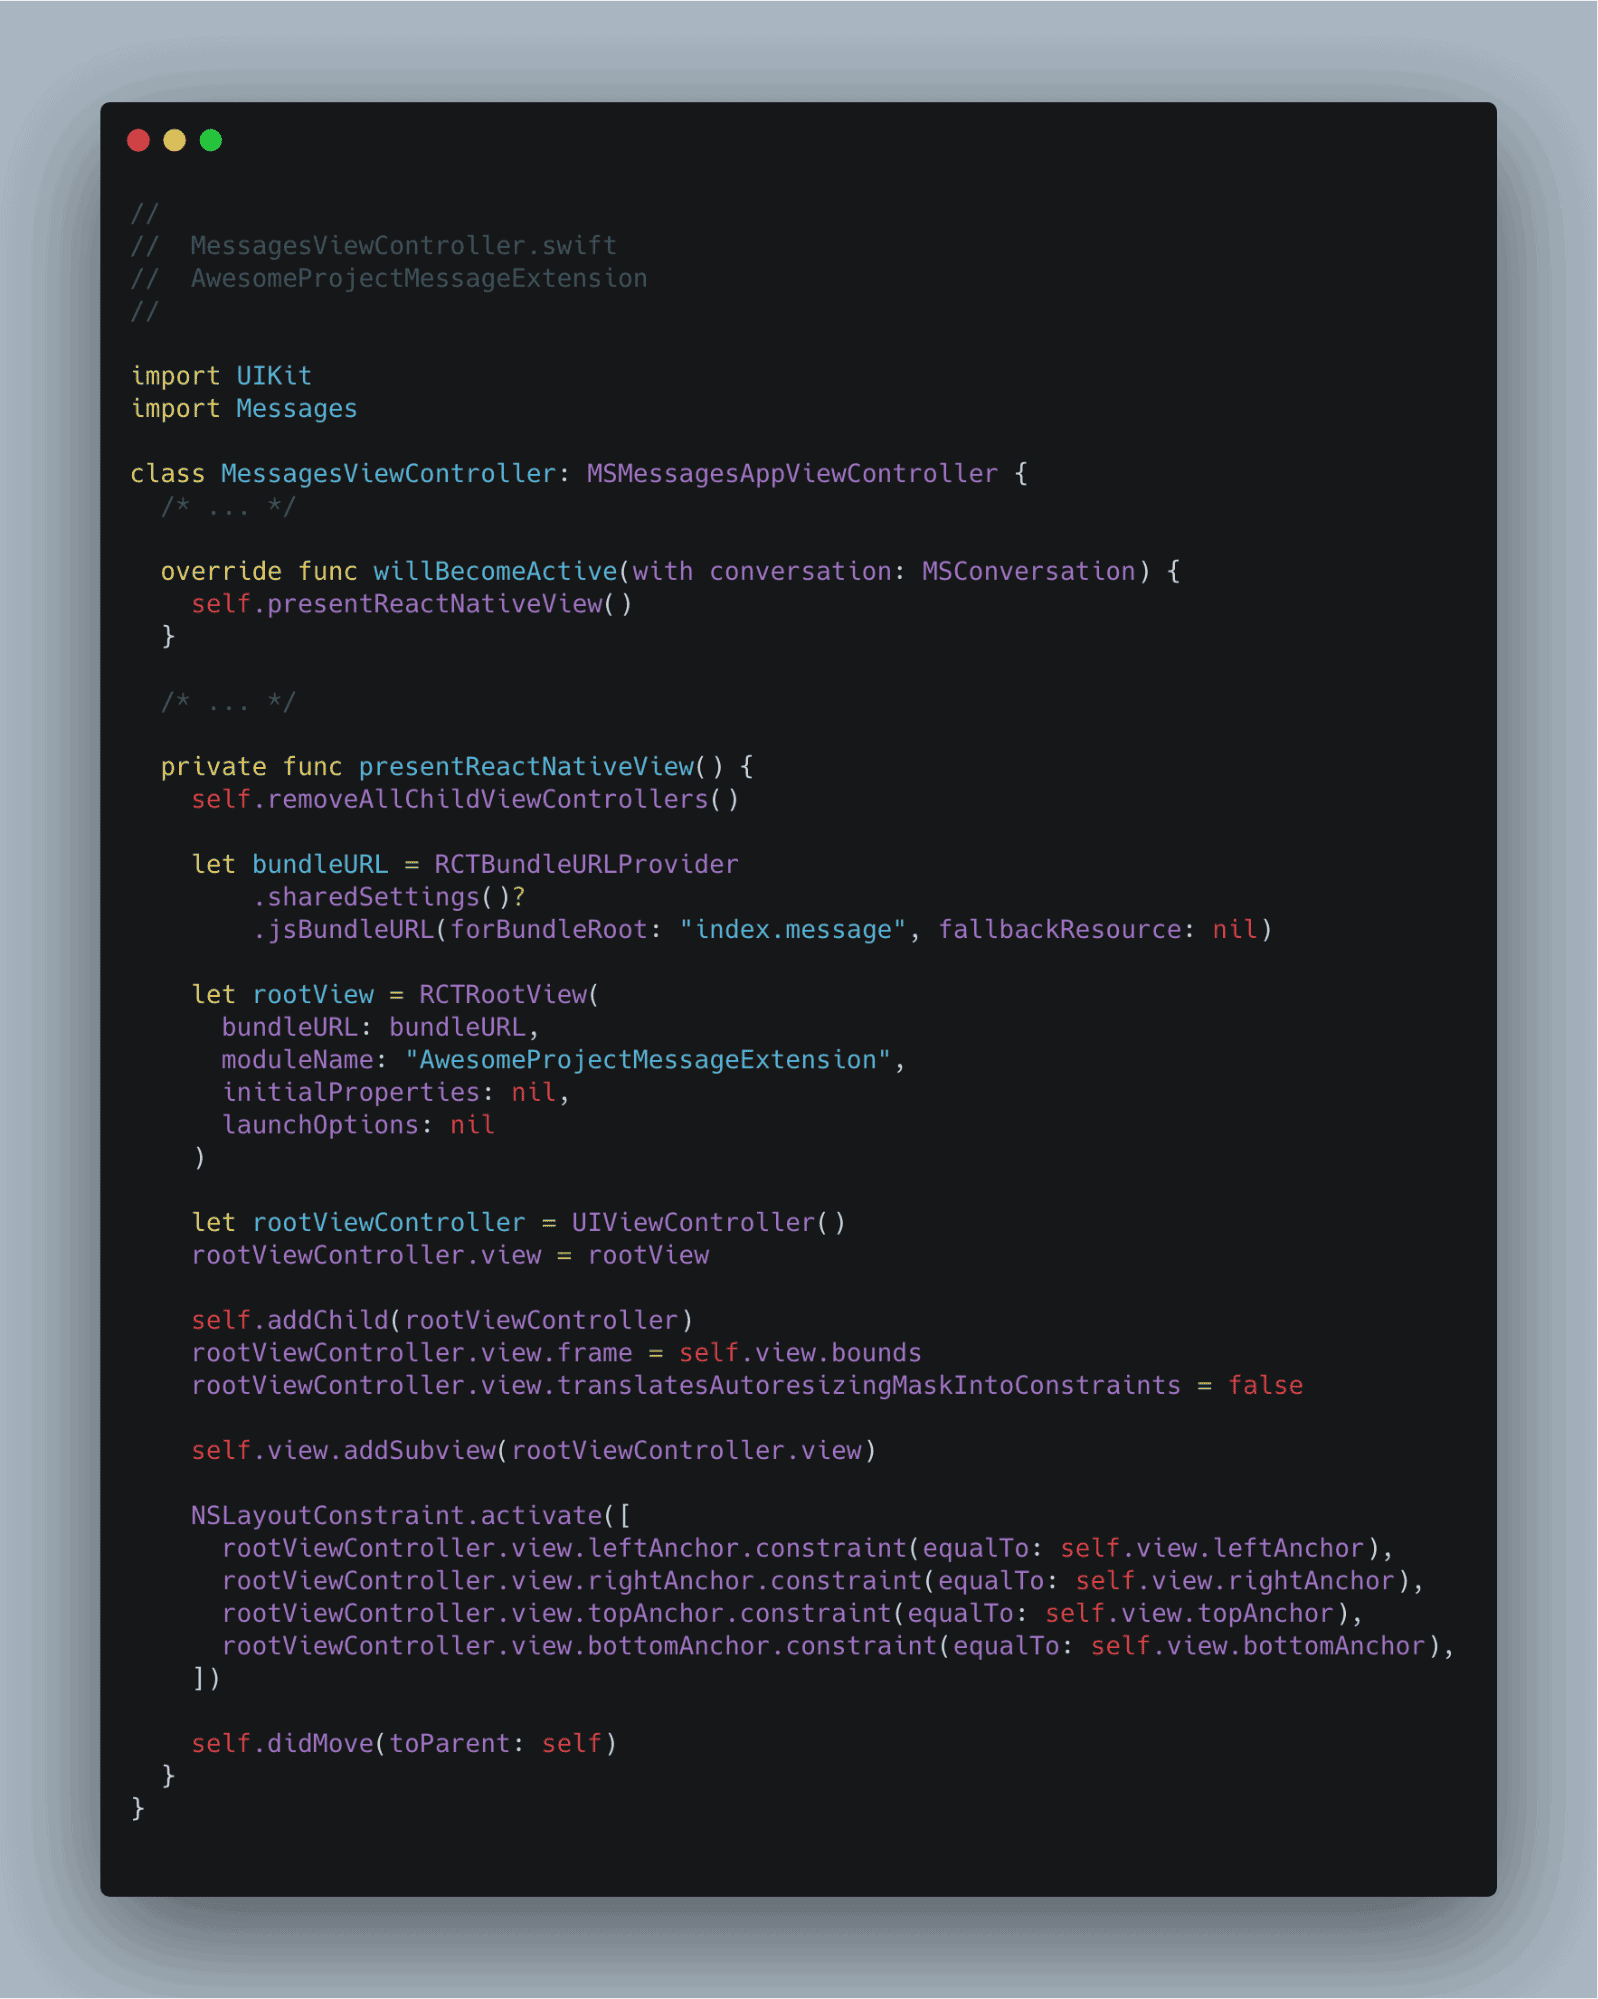
Here’s another module that will help us clear out everything before and after we open our iMessage extension. This is one of the main reasons why people are drifting towards React instead of Angular.
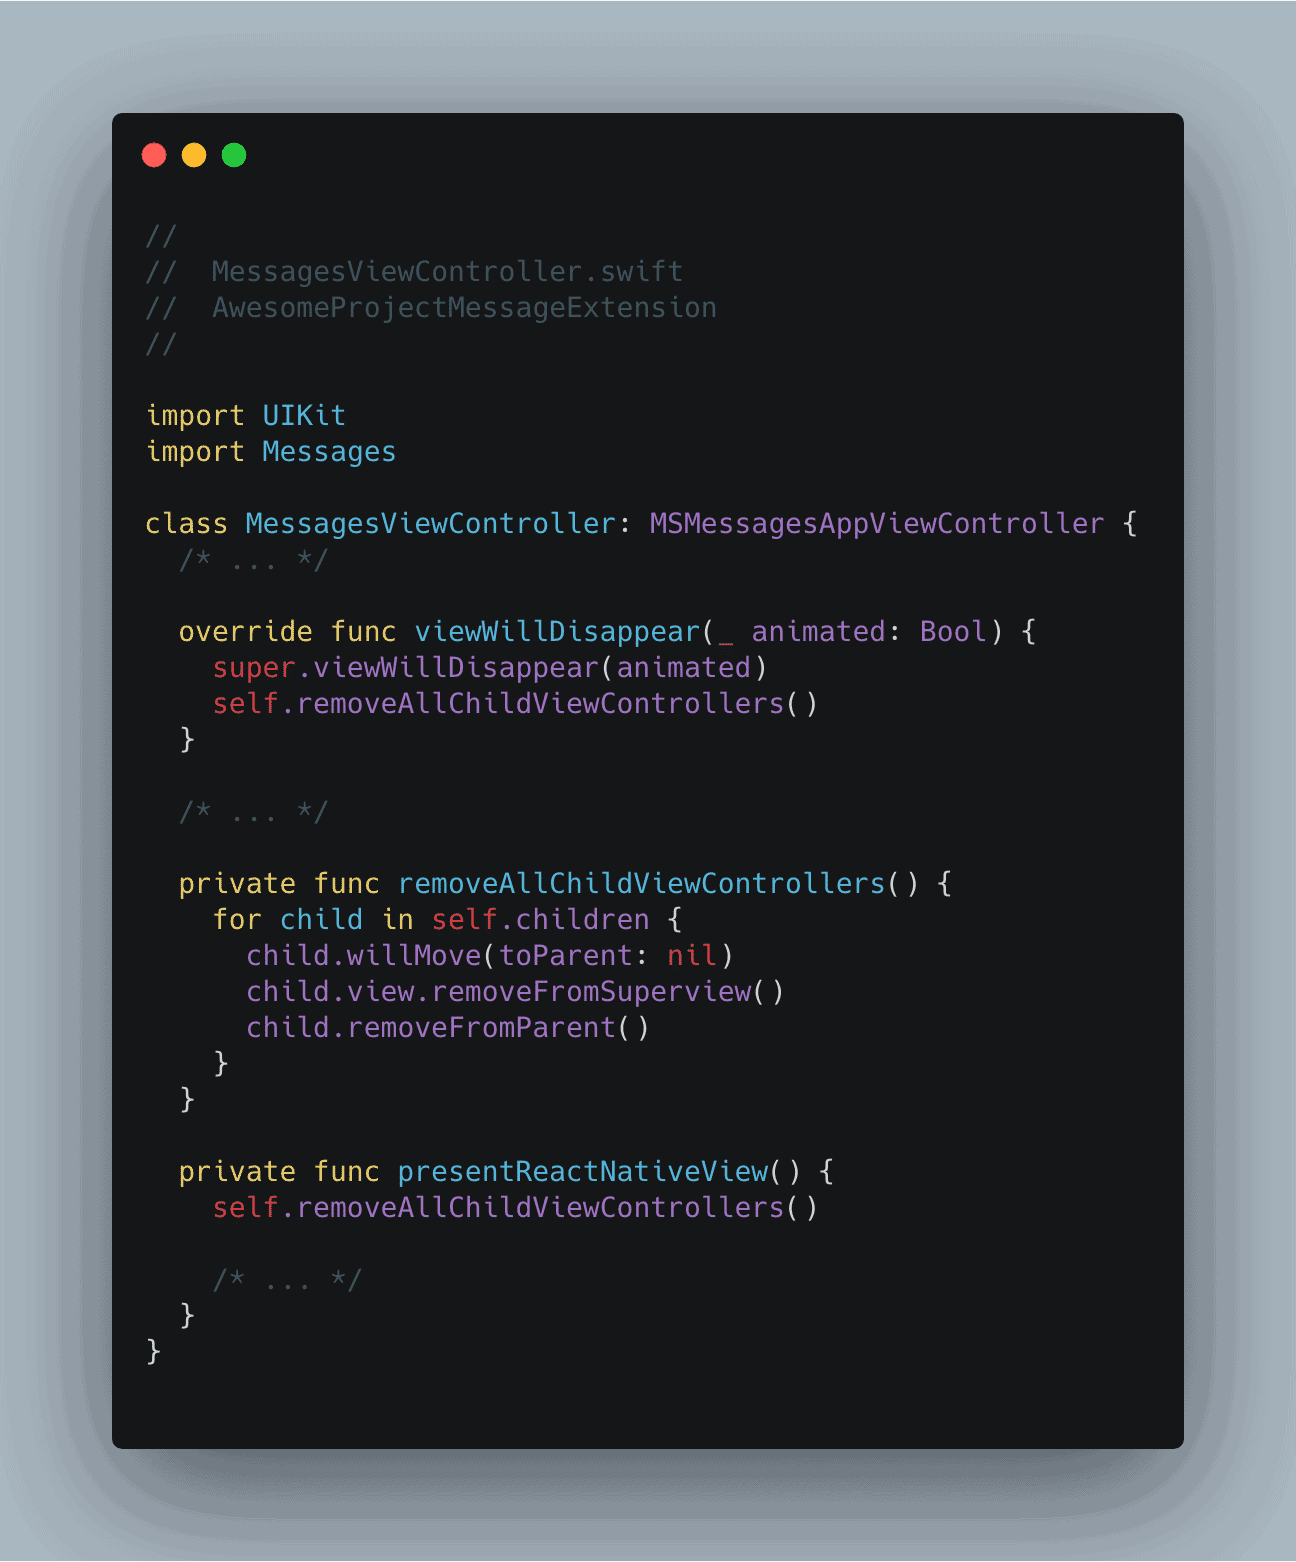
We will need modules that enable communication between Swift and React Native. These modules will ensure that requests and responses are transferred and conveyed at both ends.
Step 9: Build Mapper (For Swift)
In this section, we will ensure that communication between Swift and React Native is done flawlessly. So, we will create a mapper to format the data according to our wish.
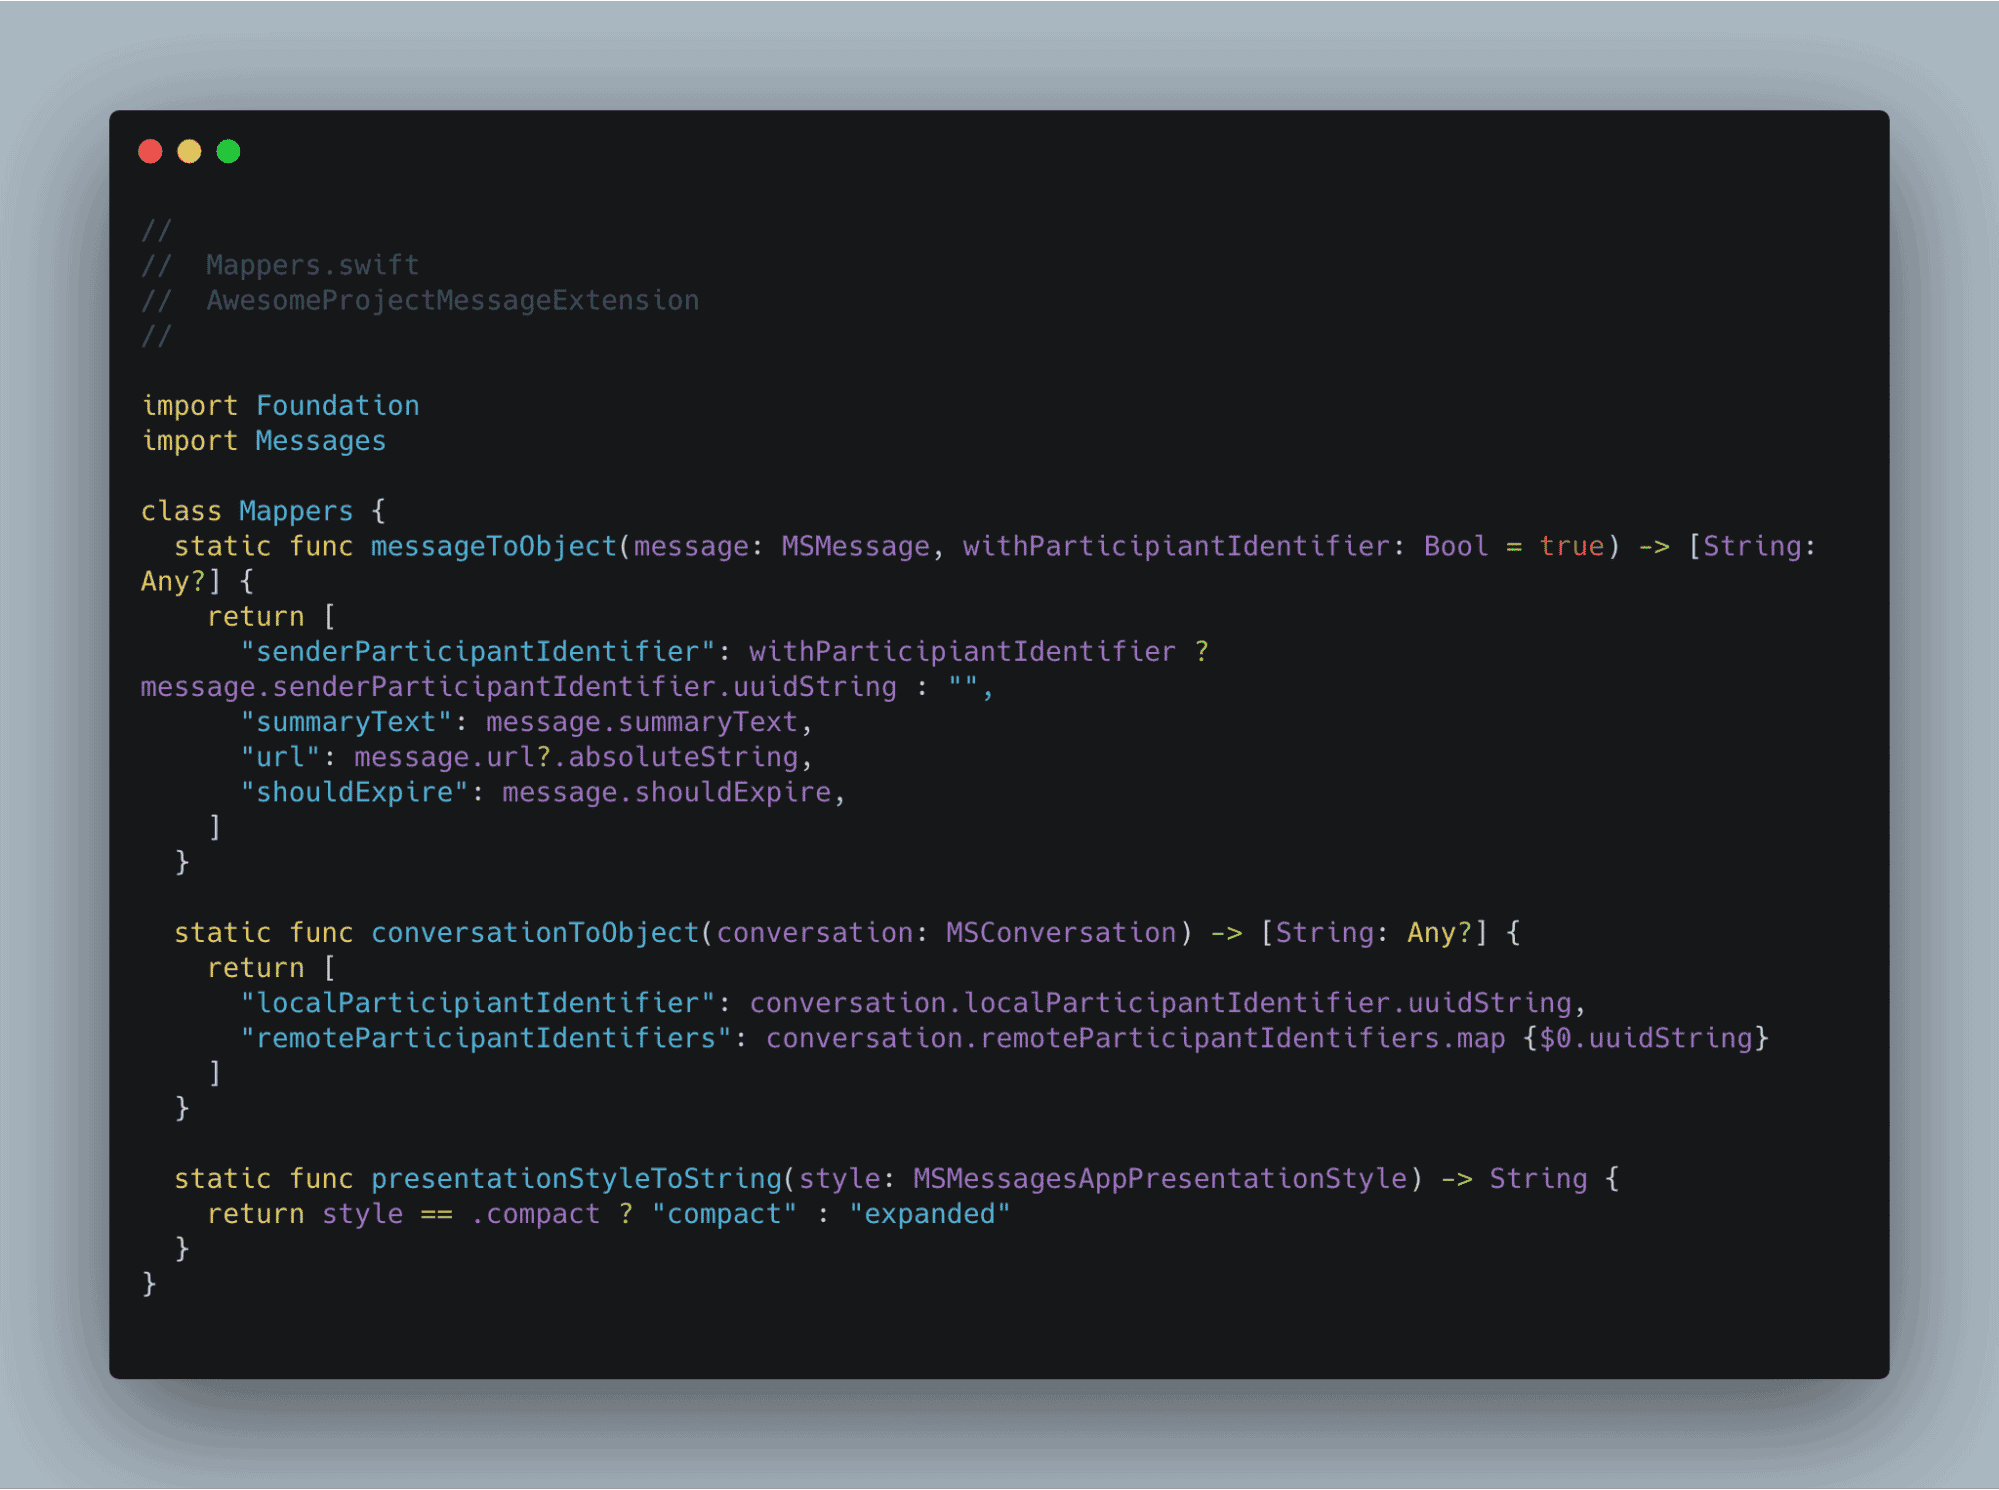
Step 10: Create Manager in MessagesViewController
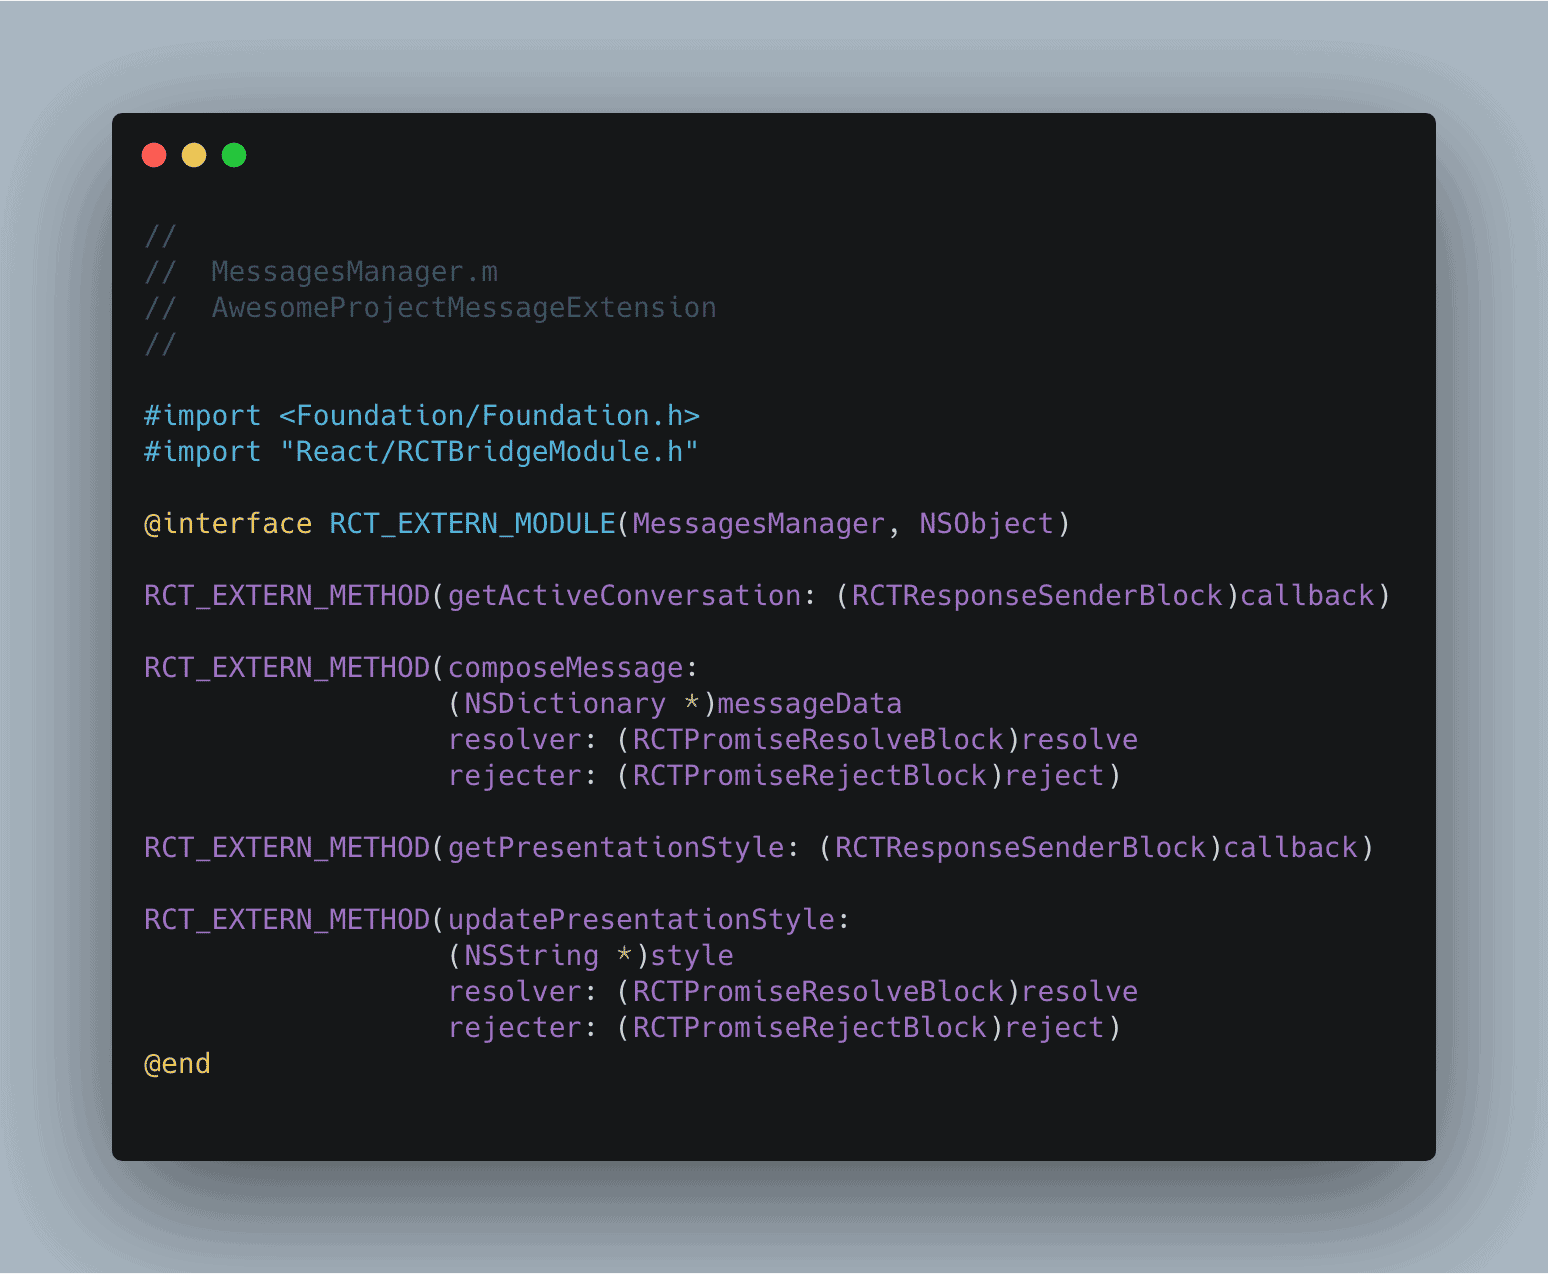
Now we are going to build MessagesManager for our MessageViwController so that we can interact with the interface from the react-native side.
This MessagesManager will allow us to communicate from the React Native side without any hassle.
To do this task, we will need access to an object of activeConversion and presentation style to let do modifications as per our choice.
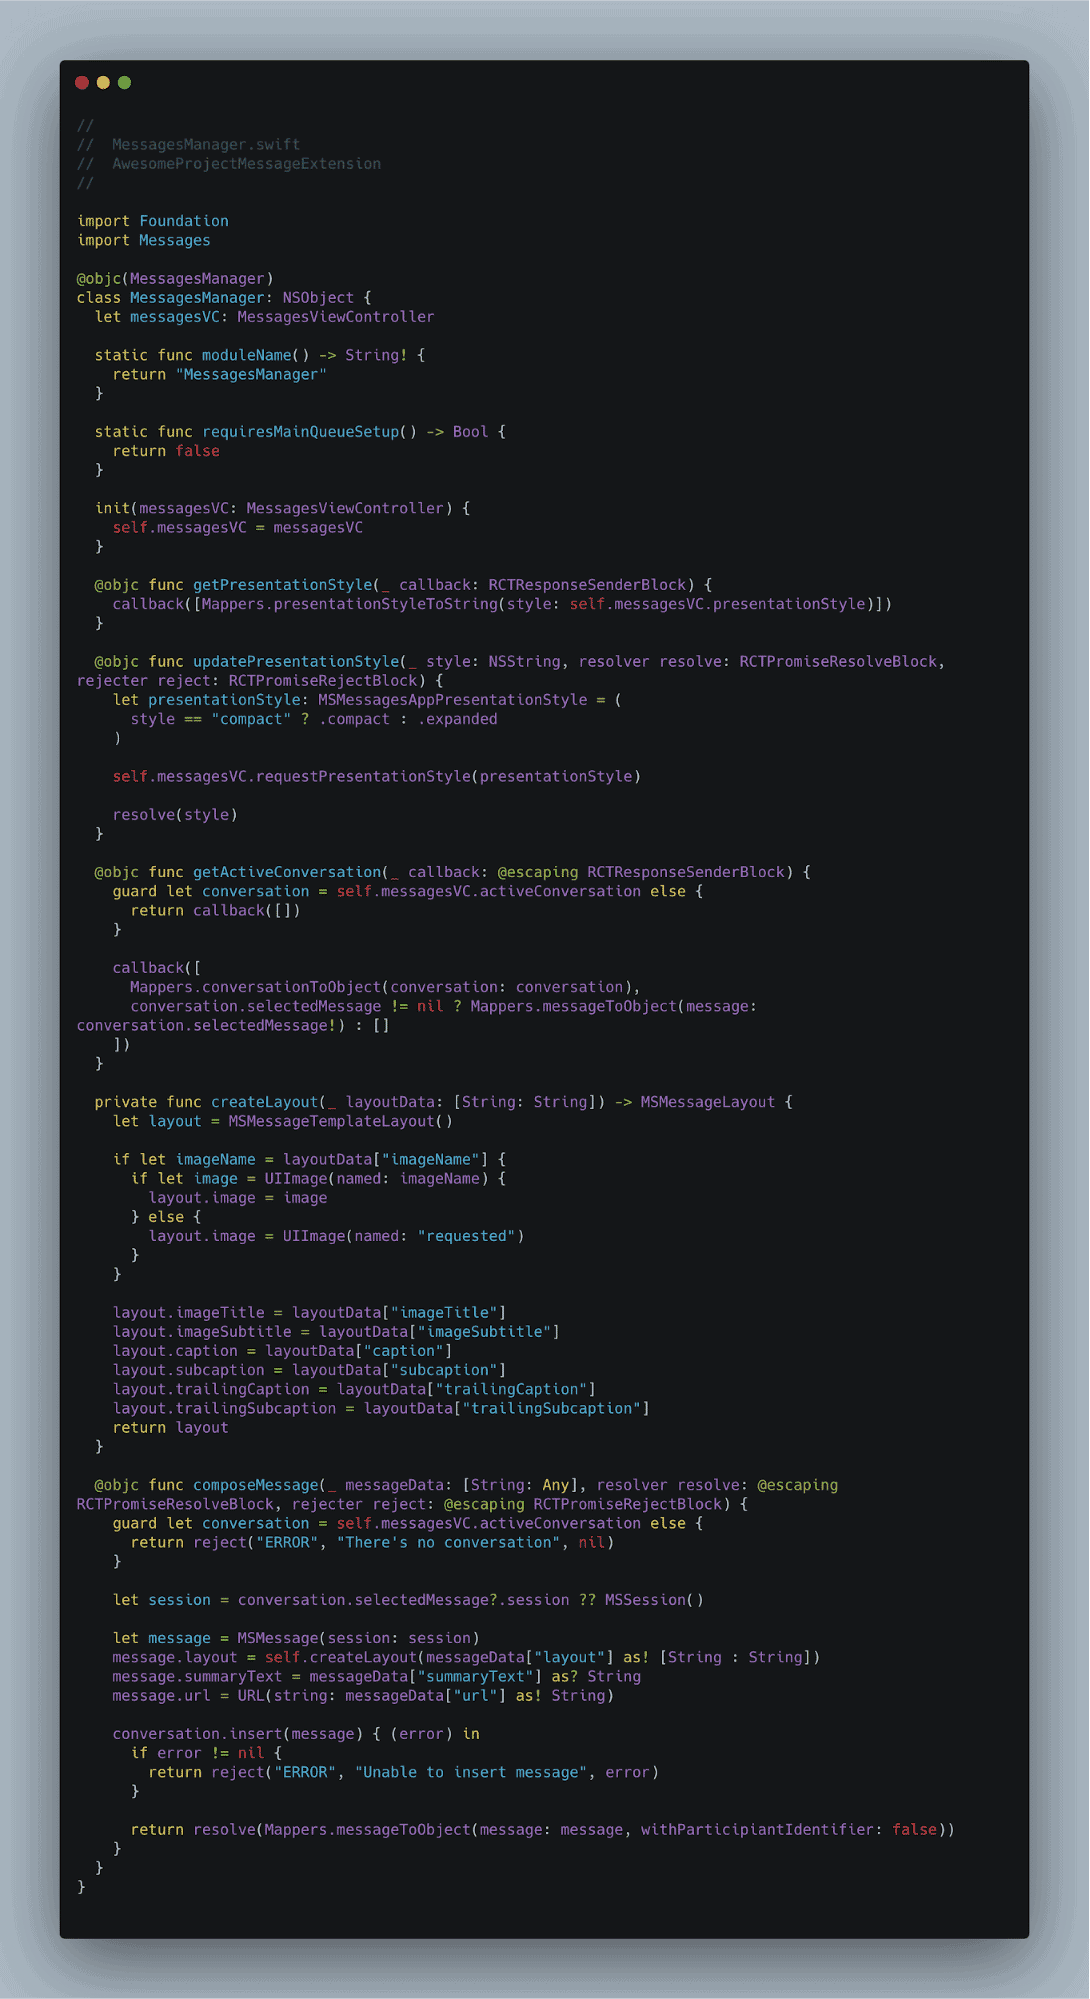
If you have observed, here, we are working with Shift and creating a class in that language. To make the interface file comprehensible to the React Native side, we need to write the following code.
Read also: React Native Database – How To Choose Right Database For React Native App? (Pricing & Benefits)
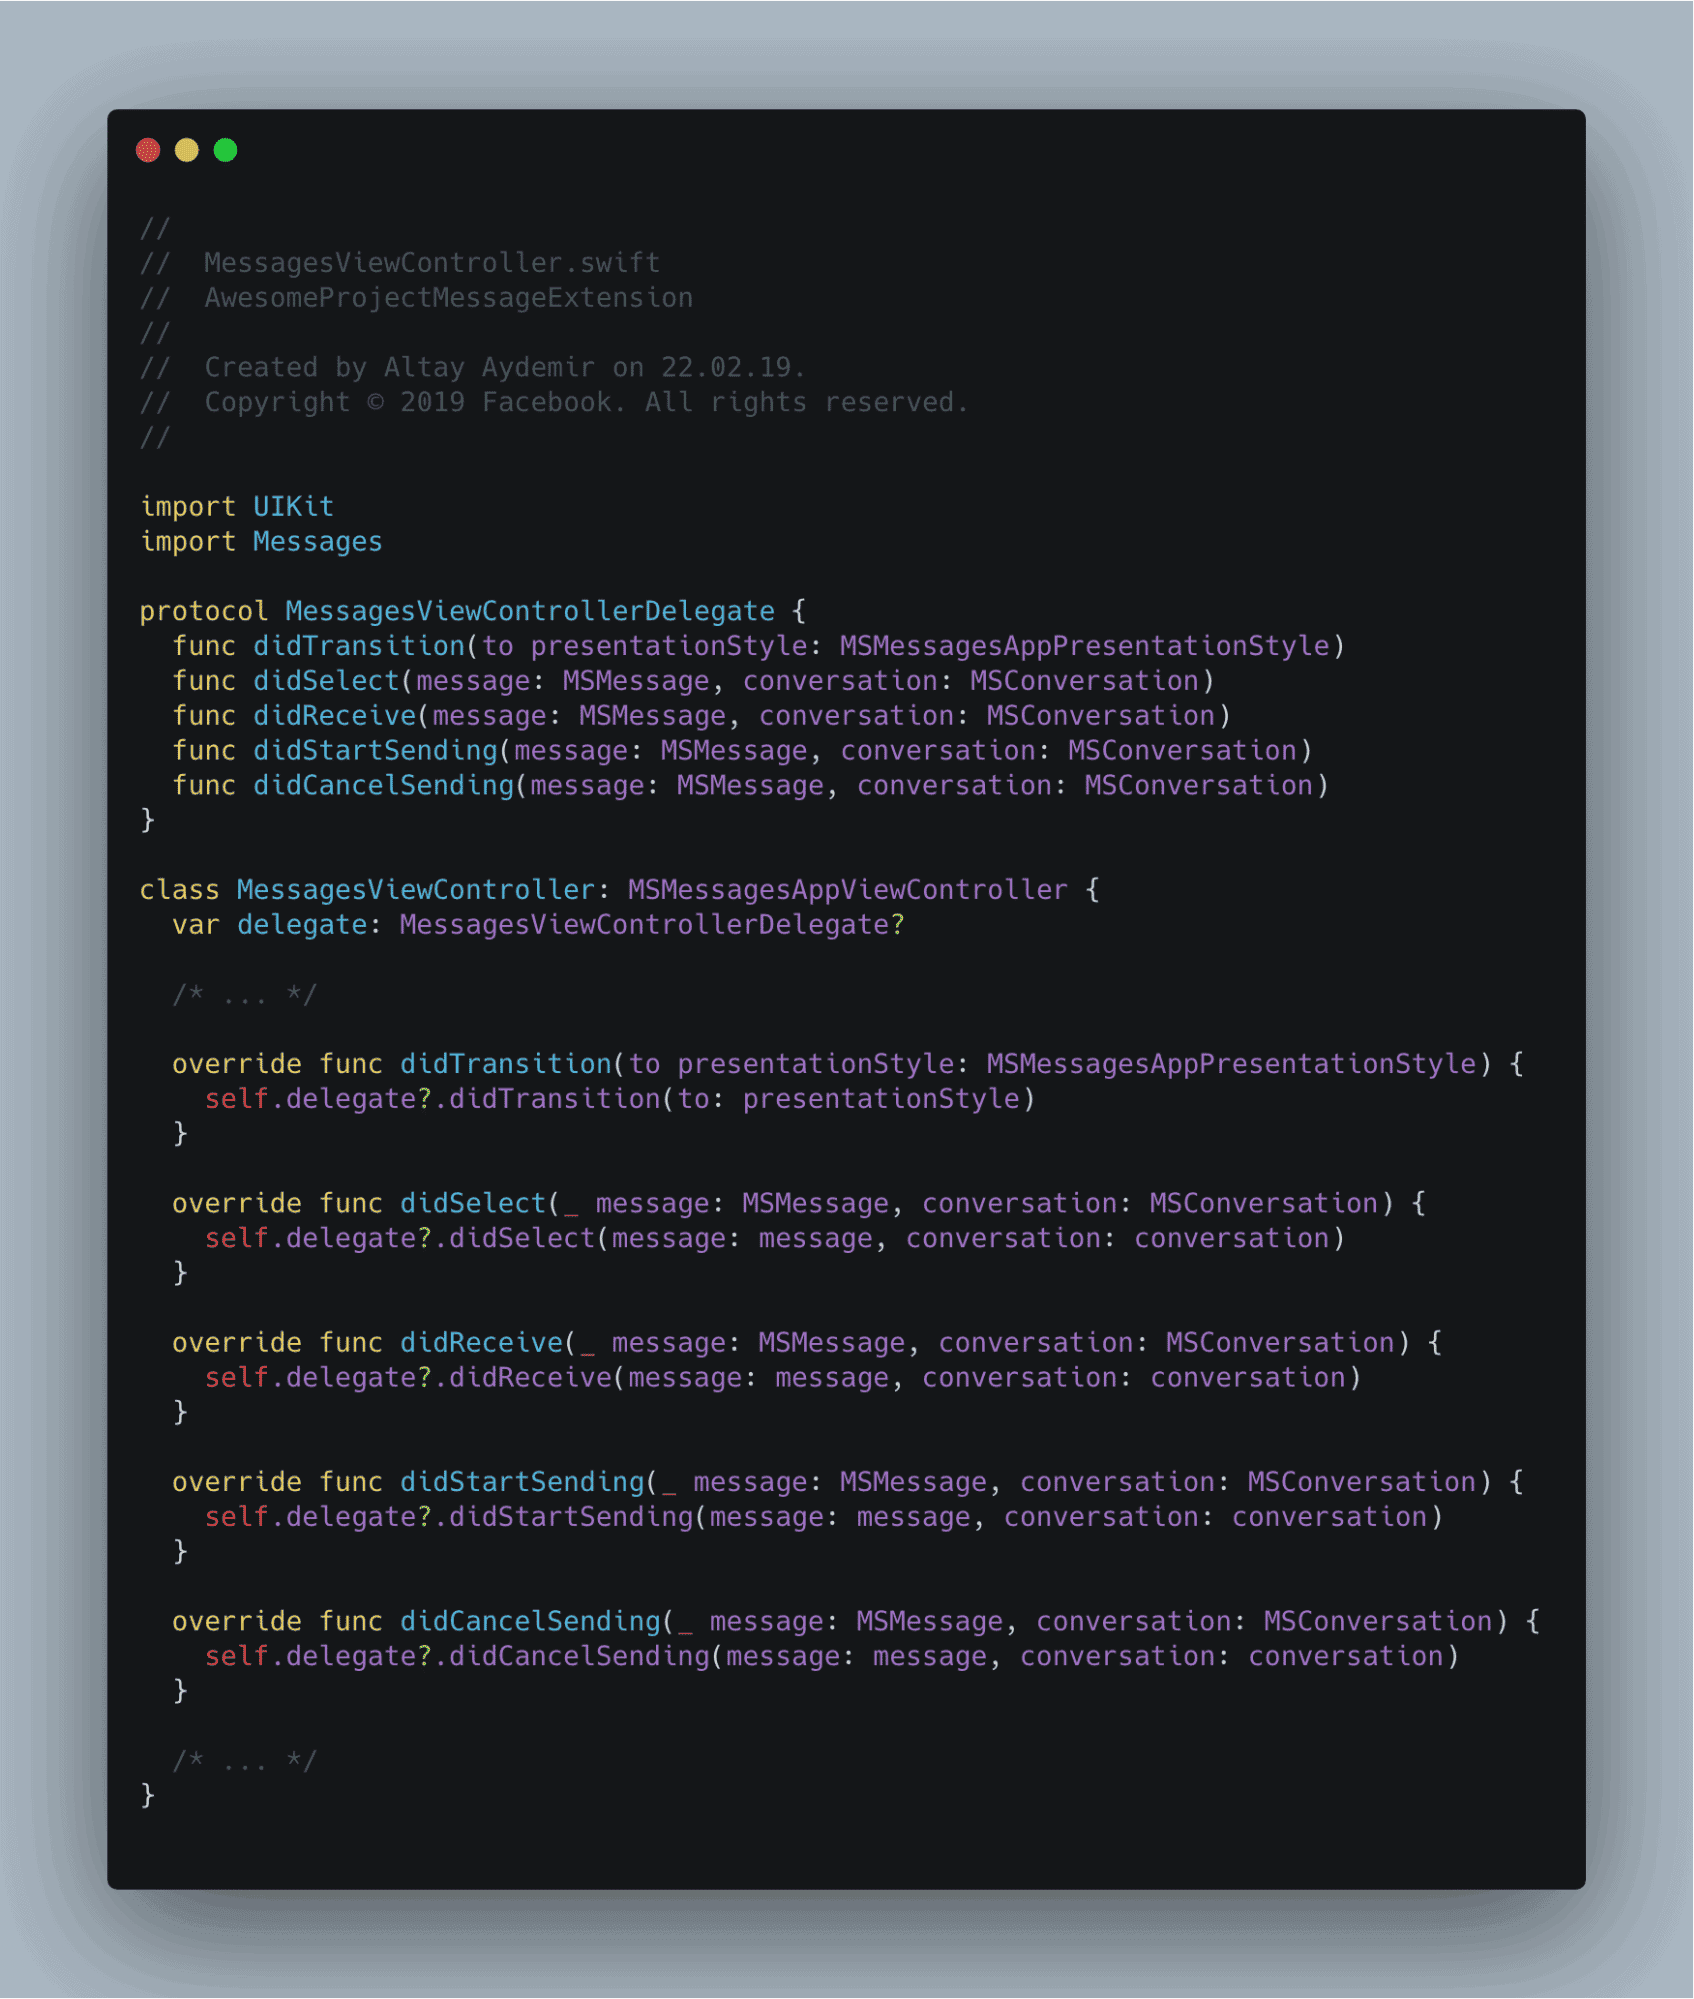
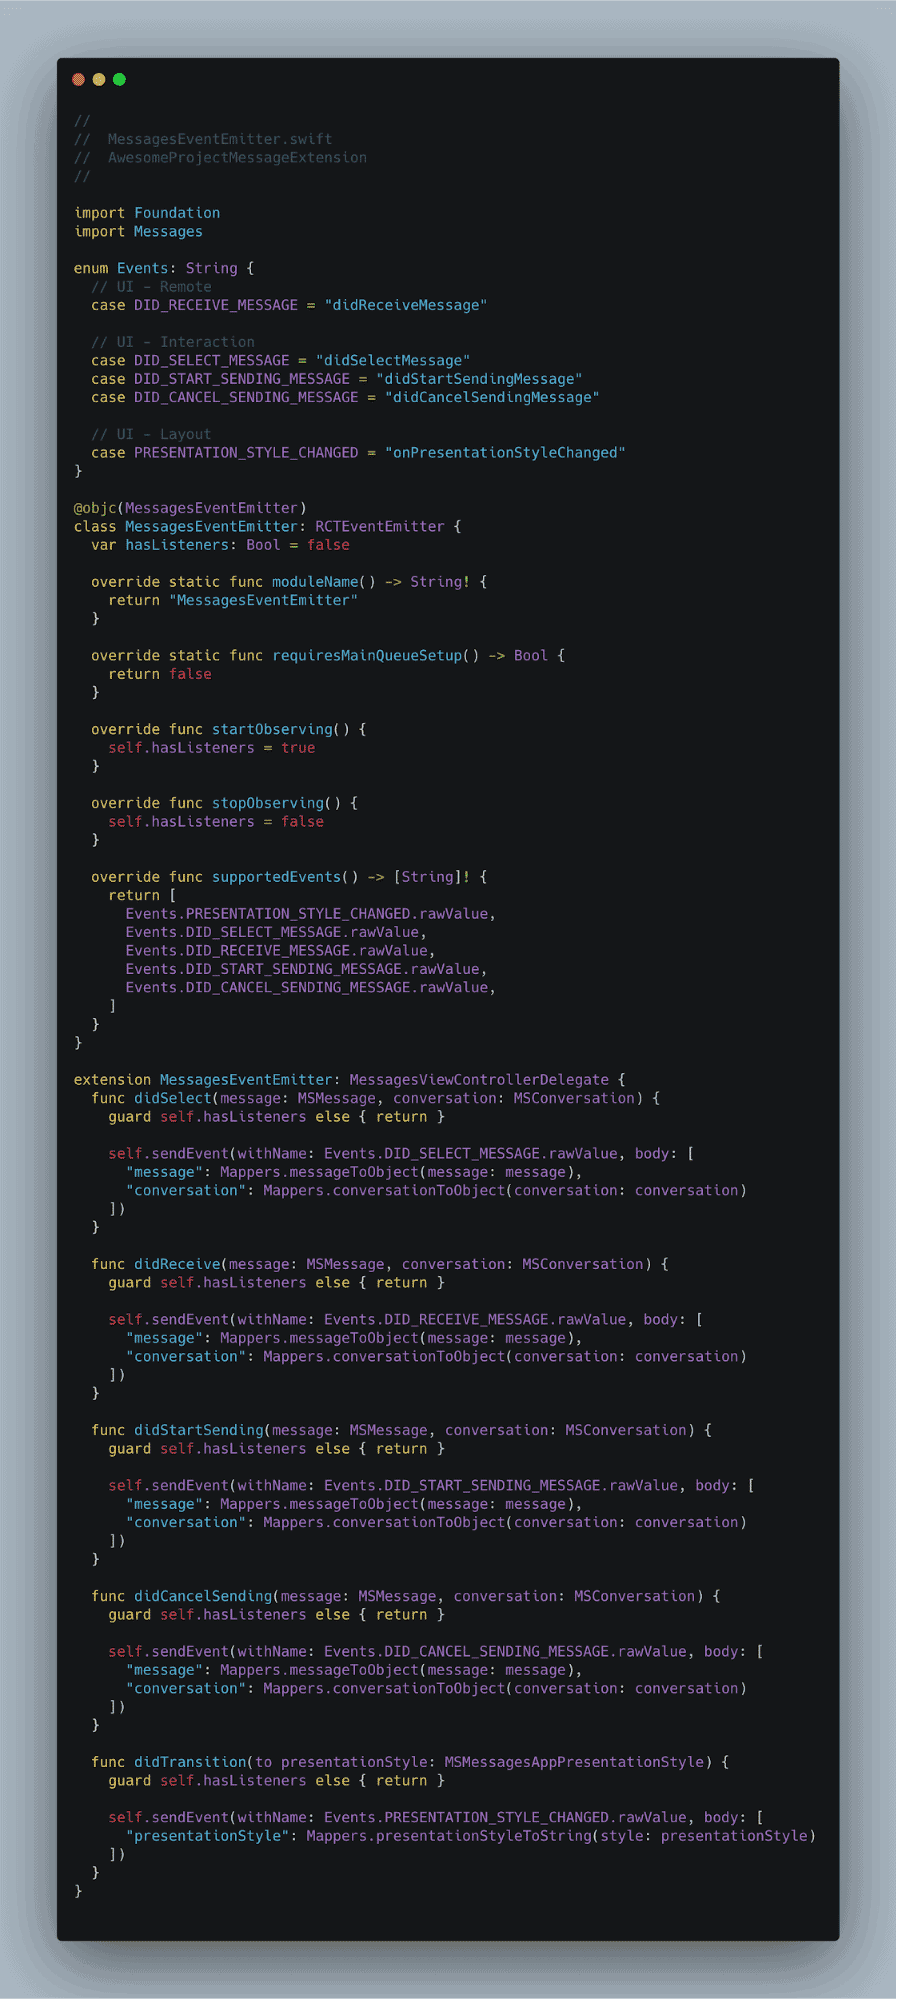
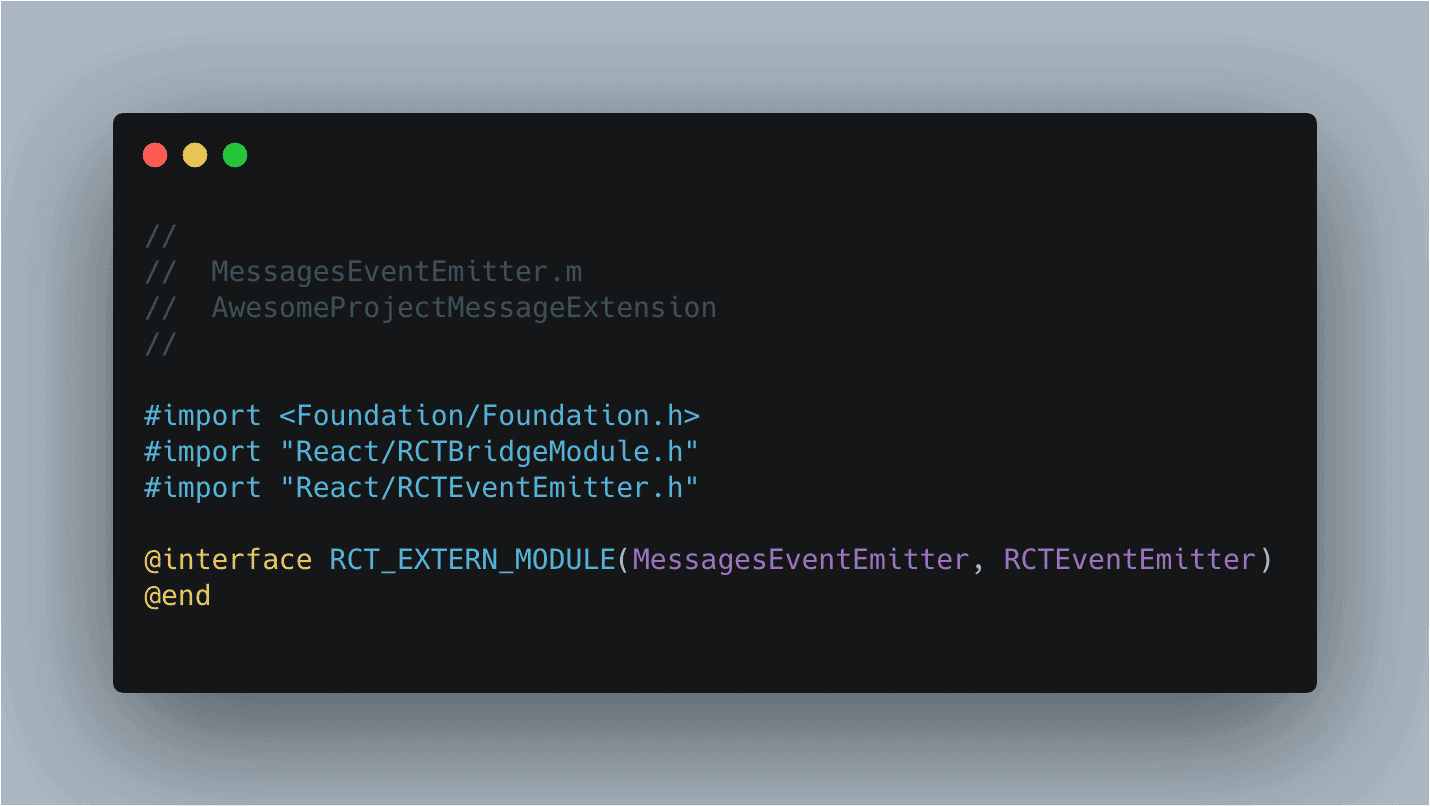
Step 11: Write code for EventEmitter for ModelViewController
How do you inform your JavaScript side whenever there is a change in the context of your iMessage extension.
Moreover, you will have to ensure that the written code is robust enough to cope with the situation whenever there is a change in the context of the iMessage.
The context of the iMessage changes, which I am talking about, would be made whenever someone is talking with another individual through the iMessage app. Whenever one selects a message or receives a response from the recipient, the context of iMessage changes.
Actually, we have to upgrade the MessagesViewControllerBuilder protocol which is implemented by MessagesEventEmitter to reduce the effort they need to make to follow event-based design patterns.
Step 12: Using Native Modules in React Native
Whenever you are building an application using the React Native framework, ensure that all the required elements are available from the Native background.
So, in all the previous steps, we ensure that all the native elements are available and accessible to the React Native side.
Let’s begin with upgrading the presentation style.
You can write the code below to upgrade the style.
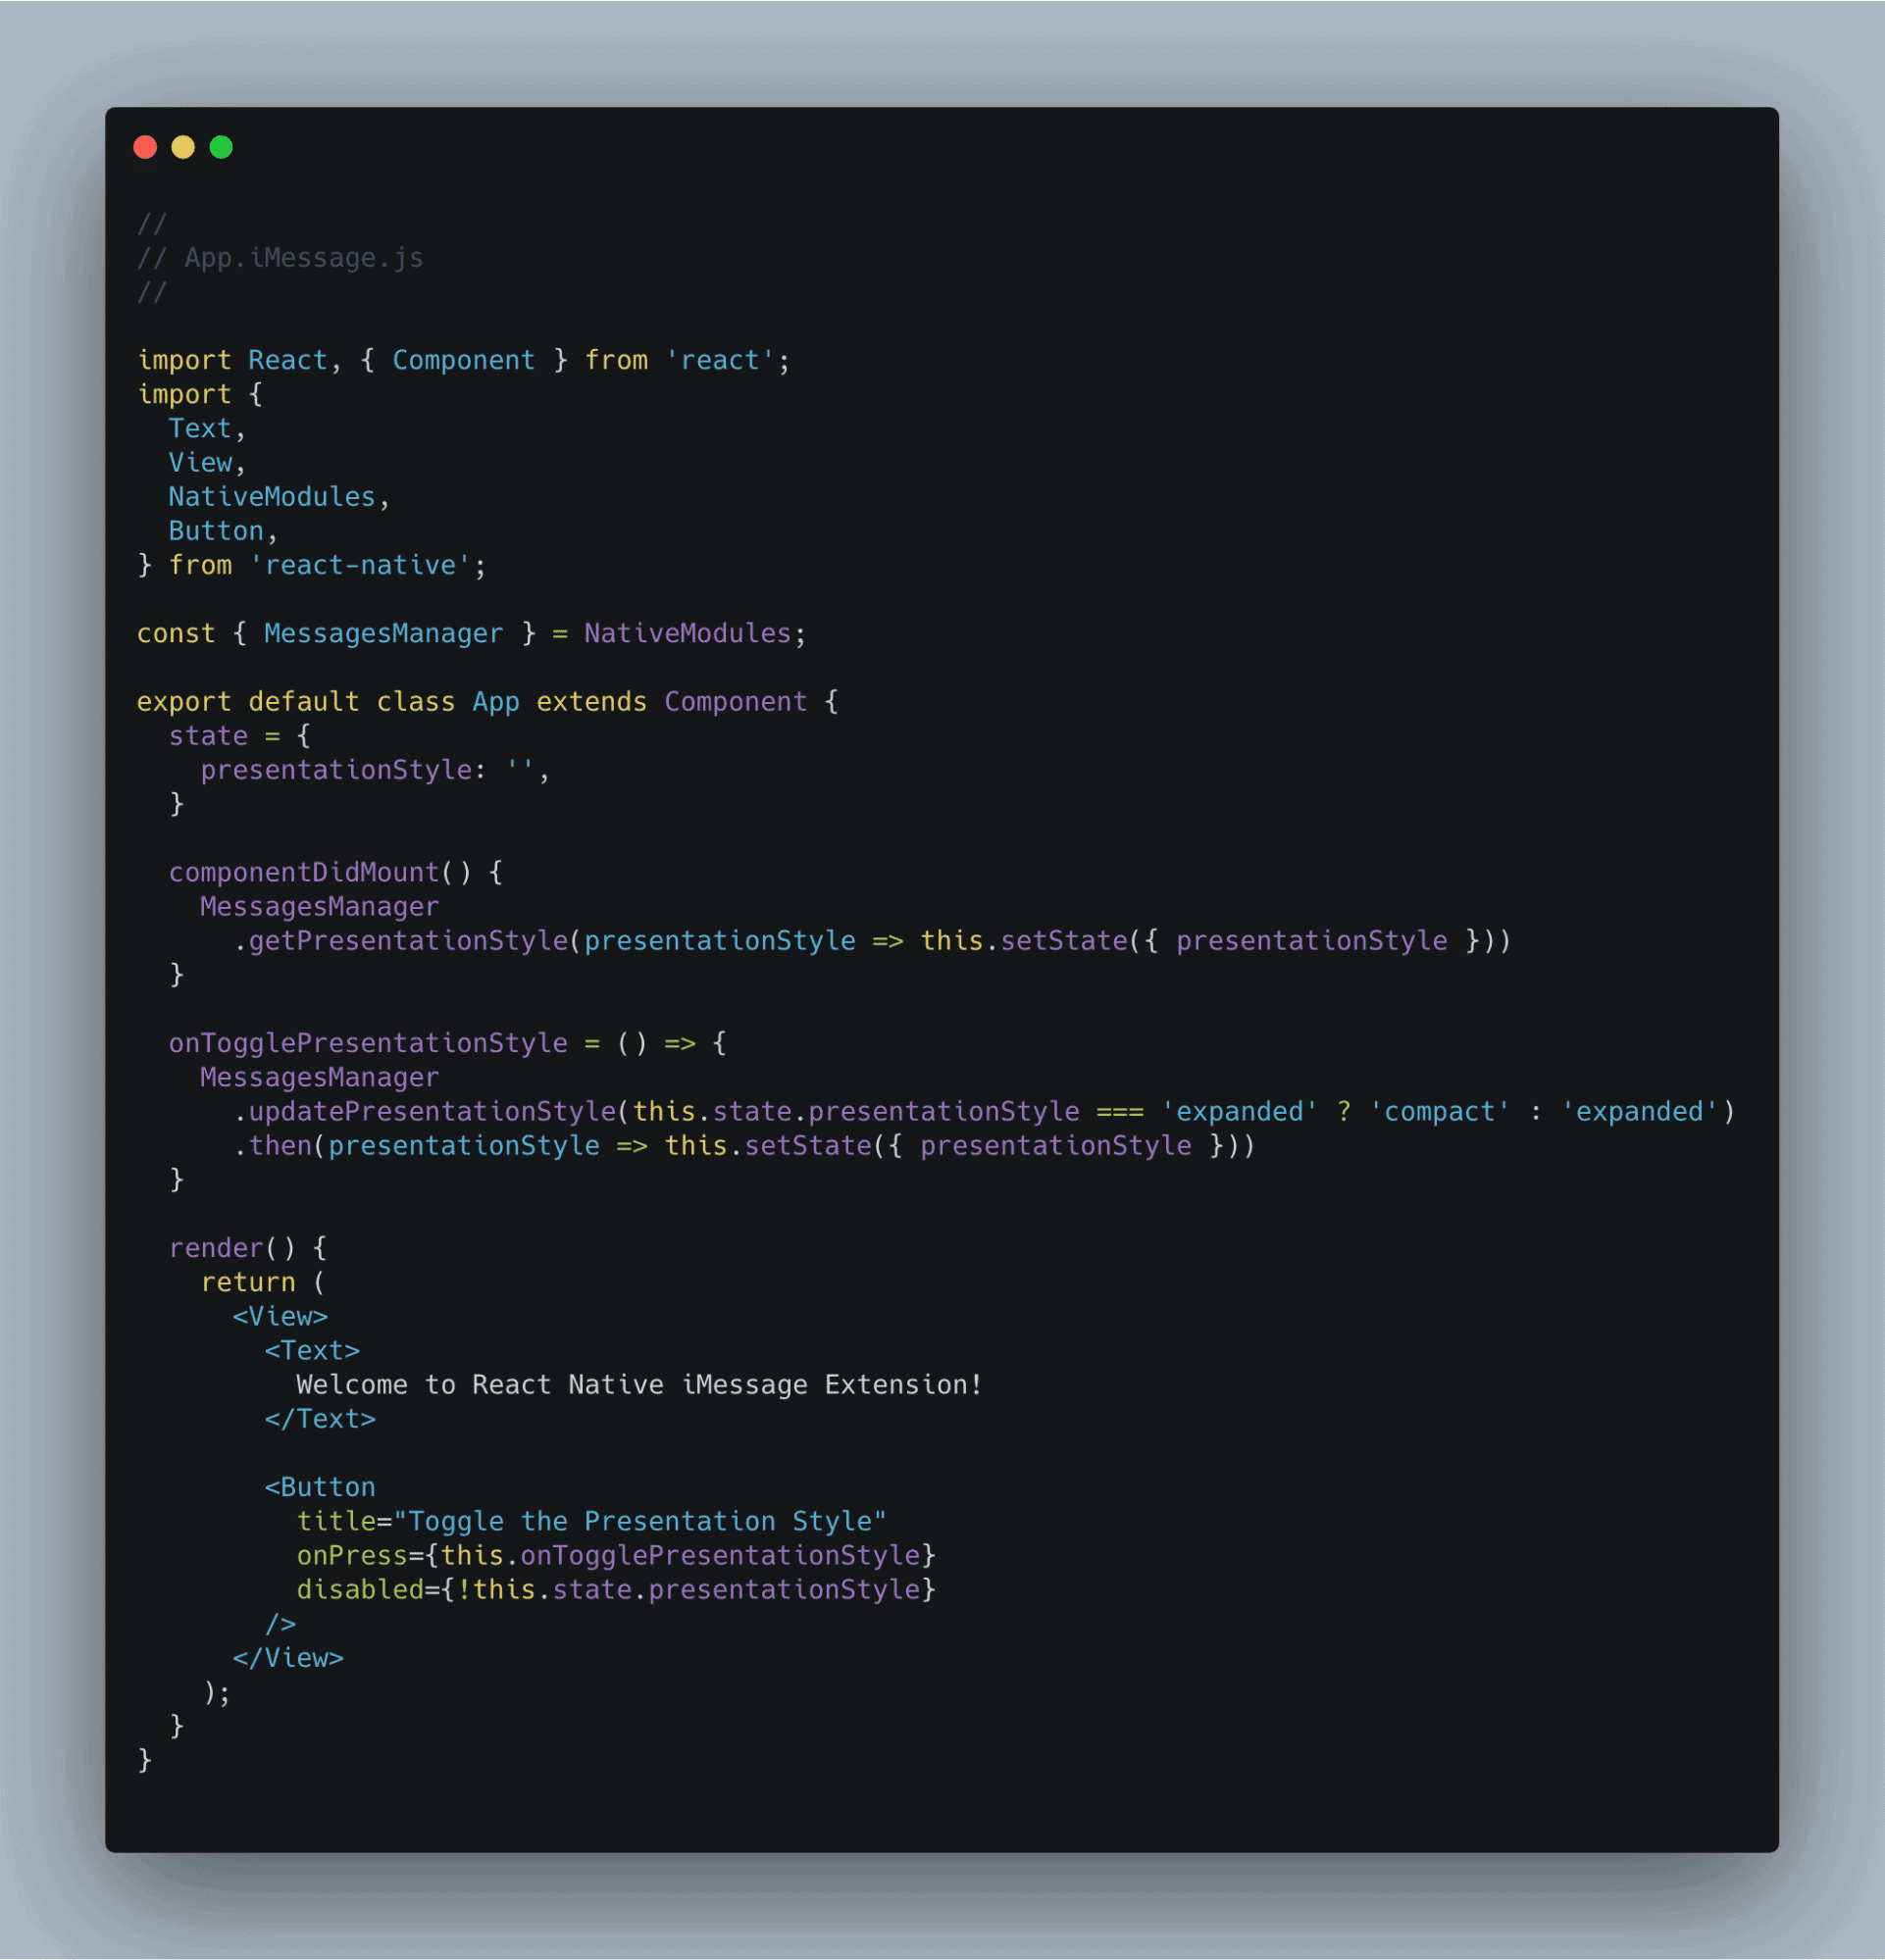
As you can see from the code snippet above, we have used, getPresentationStyle, and updatePresentationStyle in our code to upgrade the presentation style.
Now, you can start using the application.
Seen something weird? Yes, we are getting caught in a loop where the sheet is continuously opening even though it is not required.
The events which are triggering eventually updates the presentation style from the native UI. But we haven’t defined the correct value of presentation style and therefore, we are forced to stick in a loop of continuously opening date sheet.
We, again, have to go to MessagesEventEmitter code to get these issues resolved as quickly as possible.
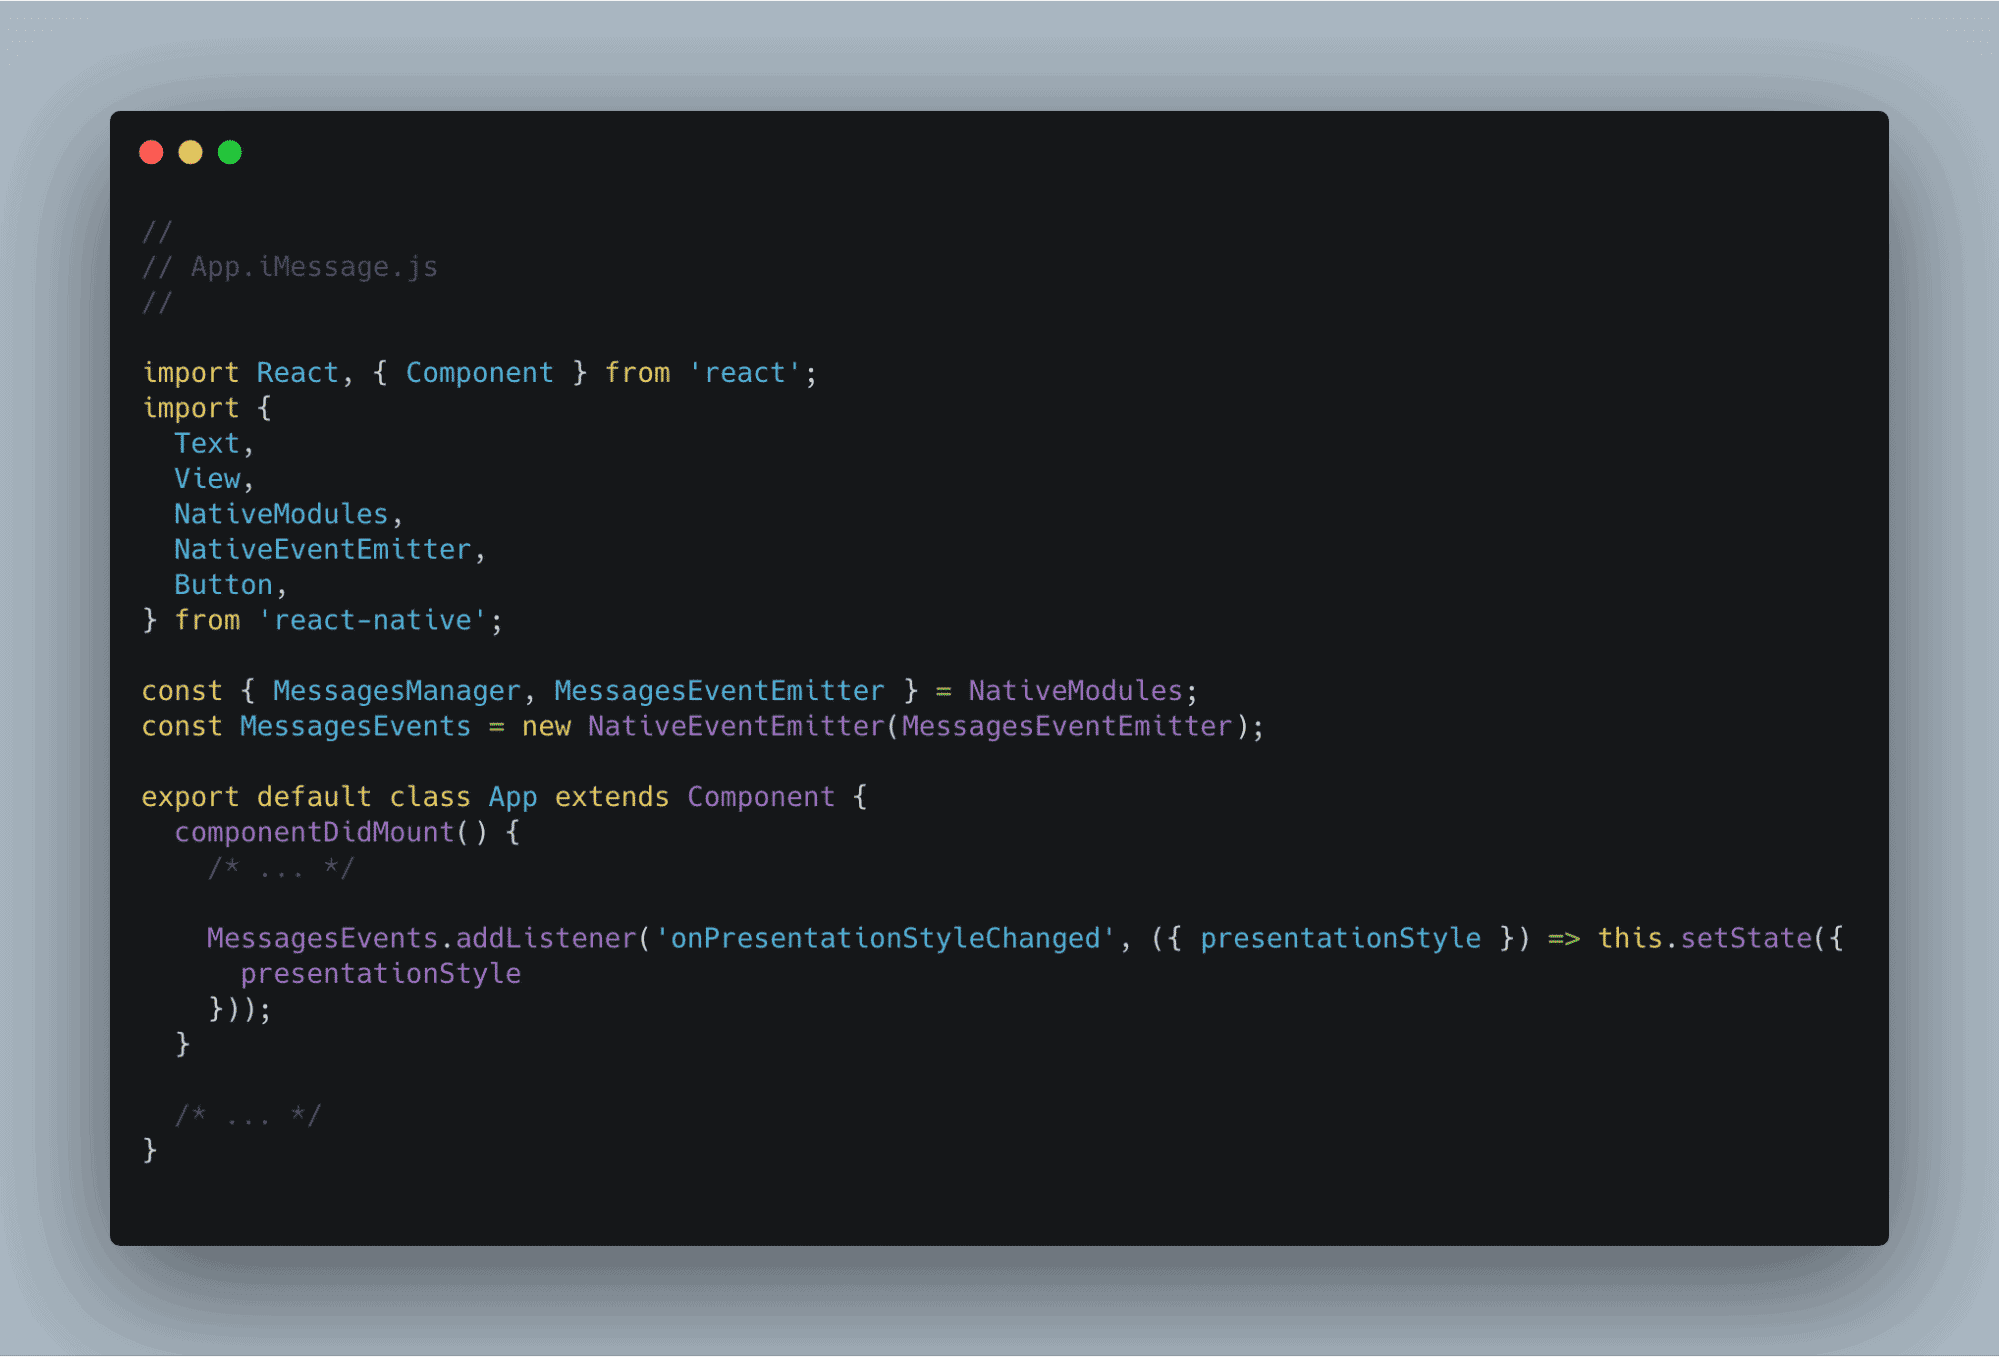
Here we want the code to dynamically respond to update which is done by the user.
Hence, both the platforms, React Native and Swift, would be on the same page whenever the user changes the state of the application.
Now, we are coming to our final stage where we will compose a message inside the iMessage app using the React Native JavaScript framework.
We will be initializing a blueprint inside the MessagesManager to the module, and we will create a data set like below.
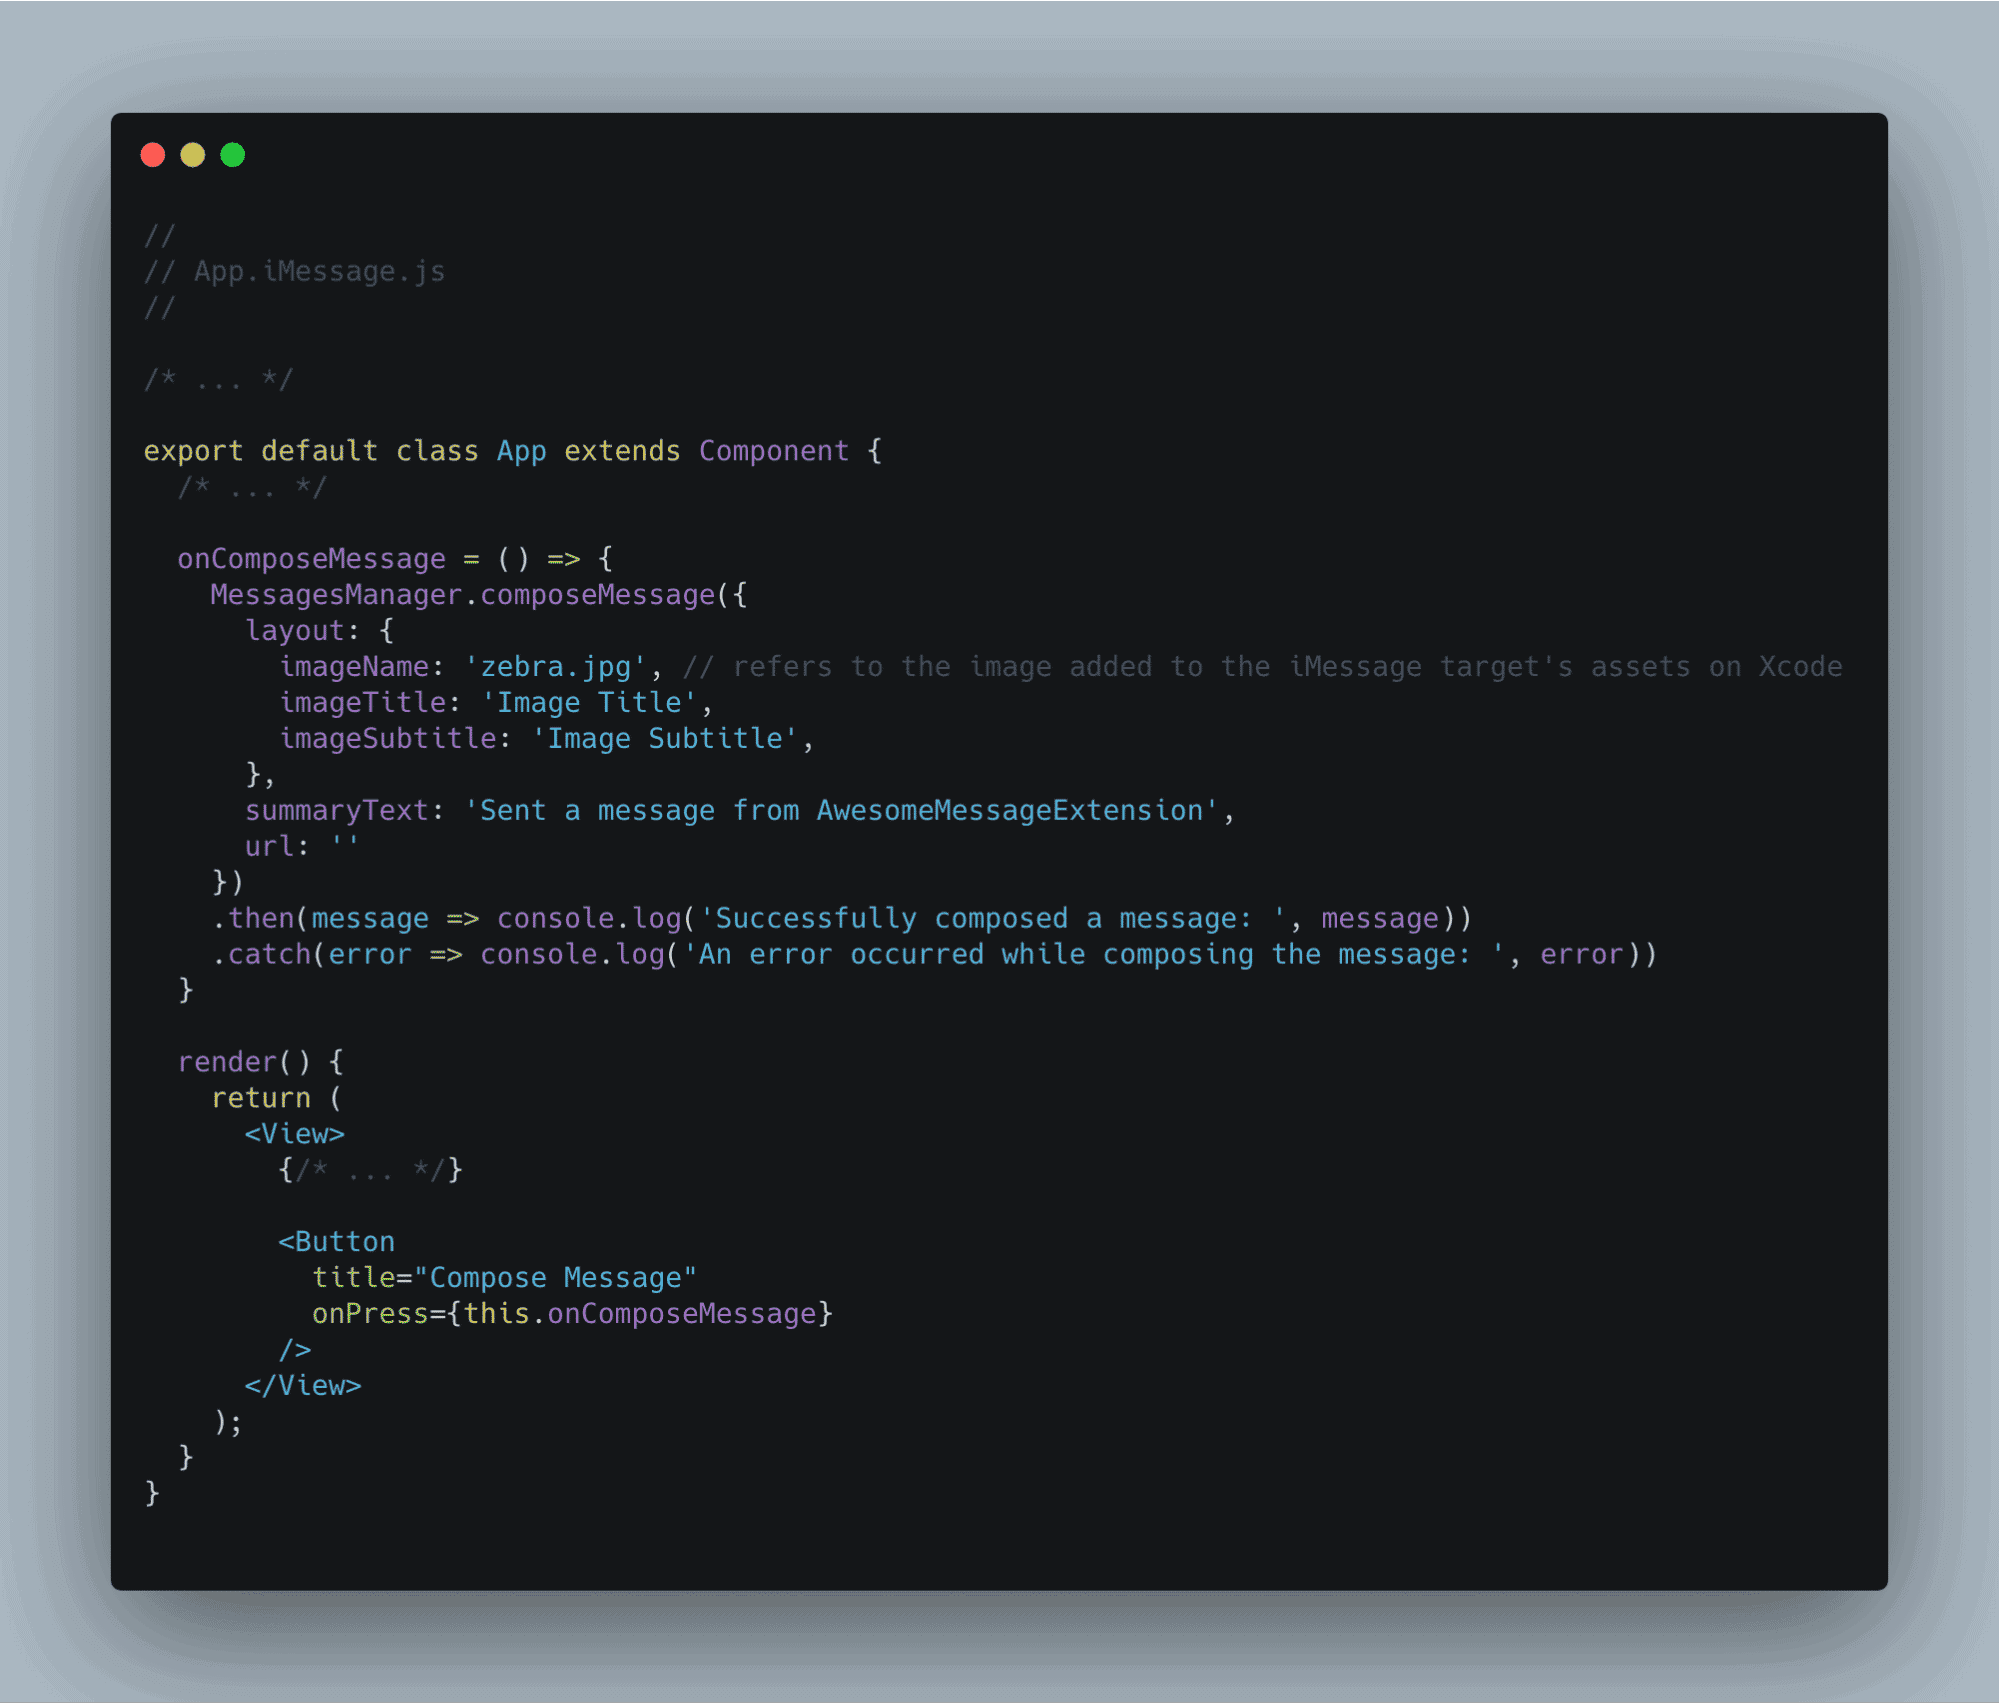
Now, we will enable users to send images in their message by working with Xcode as below.
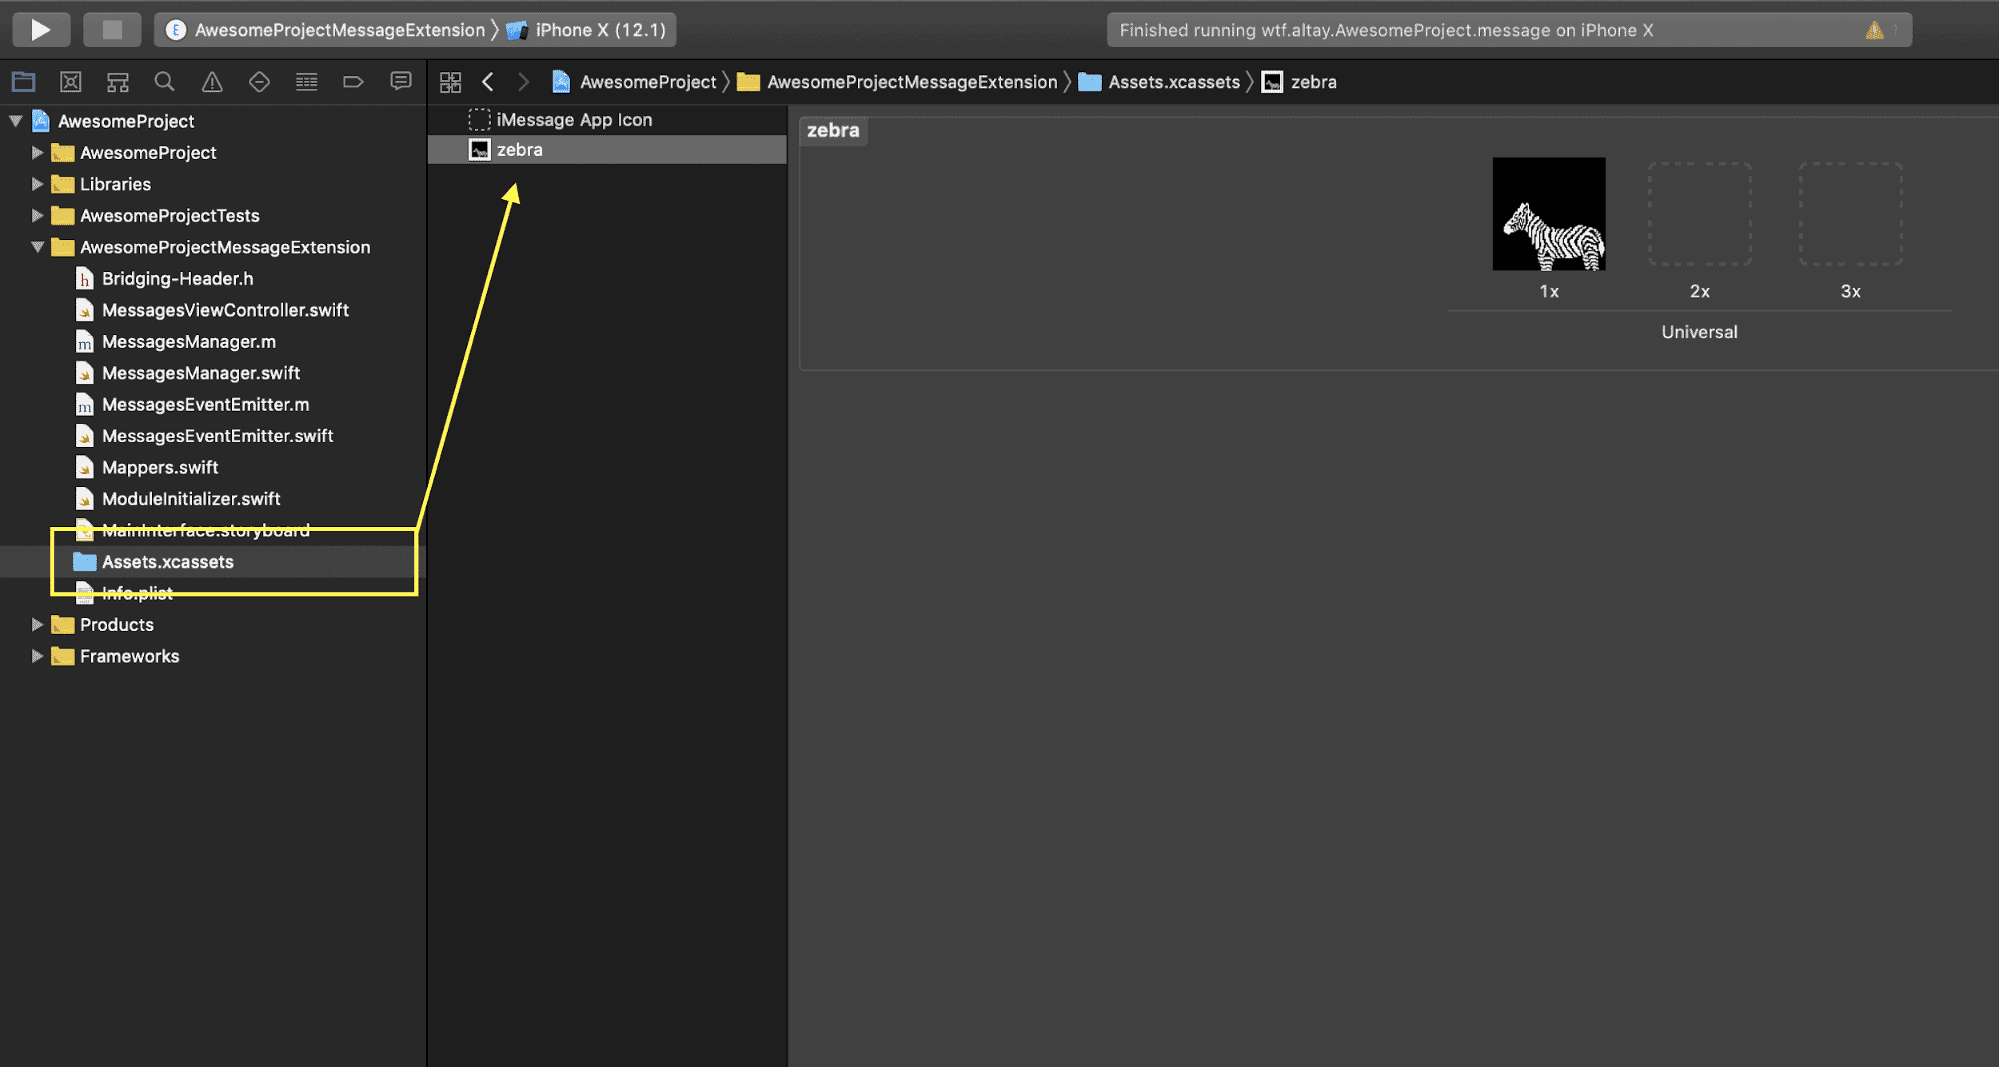
And that’s how you create an extension using the React Native framework to get the most out of iMessage. By using this extension, one will be able to build a Chat App With React Native.
Conclusion
Here, we have provided you with a step-by-step guide to build an iMessage Extension with React Native which will seal the job for you.
To make your development task much easier and smooth hire dedicated developers who can help you build potential solutions as per your project requirements.
We hope that after reading this article you will be able to enhance your knowledge base. Thank You.!
Hey, are you also looking for a world-class IT firm that can provide you with customized solutions? Then, why wait for anything to happen? Connect with eSparkBiz, right now.! We’re one of the leading React Native App Development Companies in India & USA that has a rich vein of experience & knowledge.

