By facilitating online transfers, PayPal allows customers to create their account on the platform, directly linked to their credit card or checking account. Today, we’re going to talk about PayPal Node.js integration in detail.
PayPal allows ease in transactions for all parties involved. It is also one of the most secure payment gateways, and is a popular choice for merchants too.
Many Top companies prefer NodeJS as their only solution to build robust applications and therefore Node JS Development Company in USA are in high demand as they are continuously busy in developing applications that are actually being executed in market for real time usage.
If you analyze the features of Node.js, then you will know that it supports multiple payment options. So, let’s start the show, right now.!
Key Things For PayPal Recurring Payments API Integration
The Objective Of The Tutorial
Through this blog tutorial, we wish to achieve the following objectives:
- Help users develop an account on the app.
- Help users create an application using the developer account and find the client ID and secret.
- Help users write the backend script to coordinate with the PayPal JavaScript API.
- Help users write complex Node PayPal integration codes that ensure acceptance of payments through PayPal.
Prerequisites
The prerequisites of this tutorial involve users understanding the concepts of:
- PayPal Account creation
- PayPal Node.js and npm
- ExpressJS
How Does the Checkout Integration for PayPal Work?
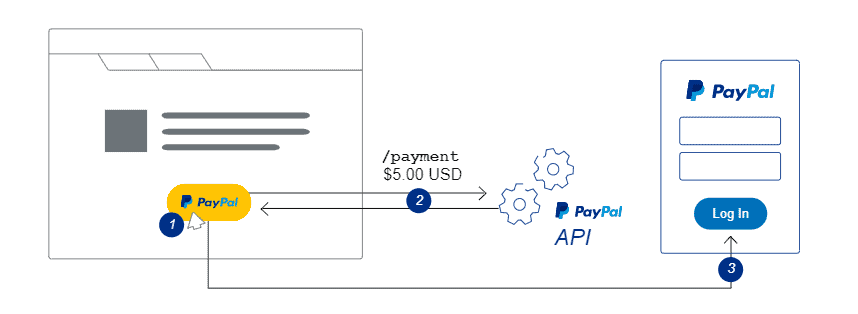
The most effective way for PayPal checkouts to work is client integration. This kind of integration requires no web servers for payment executions. The PayPal checkout button allows a direct payment execution from the browser.
Here’s how PayPal’s checkout integration functions:
- The user taps on the button that lets them check out.
- The PayPal API ensures that the payment is set up.
- This, in turn, ensures the checkout procedure being carried out in the browser.
In order to ensure the PayPal checkout integration, one needs to set up a development environment. Here’s how that is achieved:
Acquire The Code
You need to write a detailed script or code in order to begin the integration. This script will help you with the integration, with the payment set-up, with its execution, and in carrying out a trial run.
<div id="paypal-button"></div>

<script src="https://www.paypalobjects.com/api/checkout.js"></script>

<script>

  paypal.Button.render({

    // Configure environment

    env: 'sandbox',

    client: {

      sandbox: 'demo_sandbox_client_id',

      production: 'demo_production_client_id'

    },

    // Customize button (optional)

    locale: 'en_US',

    style: {

      size: 'small',

      color: 'gold',

      shape: 'pill',

    },


    // Enable Pay Now checkout flow (optional)

    commit: true,


    // Set up a payment

    payment: function(data, actions) {

      return actions.payment.create({

        transactions: [{

          amount: {

            total: '0.01',

            currency: 'USD'

          }

        }]

      });

    },

    // Execute the payment

    onAuthorize: function(data, actions) {

      return actions.payment.execute().then(function() {

        // Show a confirmation message to the buyer

        window.alert('Thank you for your purchase!');

      });

    }

  }, '#paypal-button');

</script>
Set Up Payment
Here you will be working with the //set up a payment segment of the script. This is when the buyer clicks on the PayPal button.
// Set up a payment

payment: function(data, actions) {

  return actions.payment.create({

    transactions: [{

      amount: {

        total: '0.01',

        currency: 'USD'

      }

    }]

  });

}
Execute Payment
This step is concerned with the//execute the payment segment of the script. The code can be scripted to show the authorization process and can even be customised to showcase a confirmation message.
// Execute the payment

onAuthorize: function(data, actions)

{

  return actions.payment.execute().then(function()

  {

    // Show a confirmation message to the buyer

    window.alert('Thank you for your purchase!');

  });

}
Test The Checkout Button
Before you go live, you need to carry out a trial run to find out if the checkout is smoothly managed. Here’s how you can do it:
Running the trial transactions –
- Tap the button that leads you to check out.
- With the buyer account, log in to transact.
- Conclude a trial transaction.
Corroborating the transactions –
The trial transaction that you just ran also needs to be corroborated. This needs to be done from both the buyer’s standpoint and the merchant’s standpoint
- Login to sandbox through your merchant account to check whether the fund has been deposited.
- Login to sandbox through your buyer’s account to check whether the funds have been deducted.
Once done, you are ready to go live.
Time To Take It Live
Here’s how you can get the checkout gateway launched.
Create an account for business on PayPal
- Sign Up on the site.
- Select the ‘Business Account’ option and heed the stated instructions.
Update the credentials
- Use the credentials to log into the Developer Dashboard.
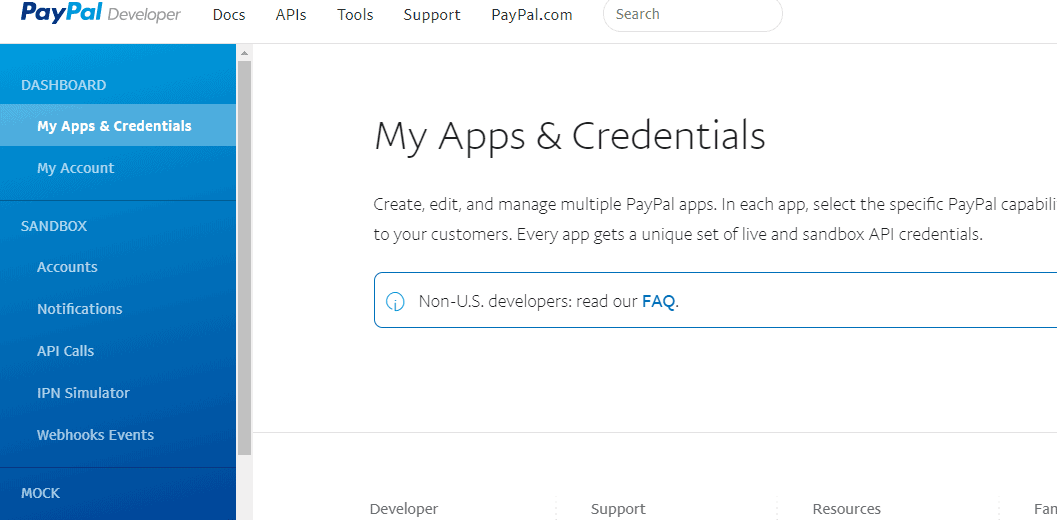
- Click on the Live option on the ‘My Apps & Credentials’ tab.
- Click on the ‘Create App’ option in the ‘REST API apps’ segment.
- Configure the live app to match that of sandbox app configuration.
- Copy the live client ID.
- In the //configure environment segment of the code, set the environment to ‘production’ and add the live client ID.
// Configure environment

env: 'production',

  client:

    {

      production: 'LIVE_CLIENT_ID' //Enter your live client ID here

    }
Test a live transaction
A live transaction trial is similar to the test conducted on the trial transaction.
Testing the live transaction
- Click on the checkout button.
- Login to the PayPal window through your real buyer account.
- Complete a real transaction.
Verifying the live transaction
You need to verify the transaction from the buyer’s as well as the merchant’s standpoint.
- Log in using the PayPal business account and confirm whether the funds have been deposited.
- Log in using the real buyer account to check whether the funds are sent.
Steps For PayPal Recurring Payments Integration With Node.js
It is important to understand what PayPal recurring payments API involves and how it can be integrated with Node.js. Here are the steps to help you understand the integration process:
Step 1: The Working of Node.js PayPal Integration
Understanding how PayPal Node.js works is pretty simple once you know the steps involved in the process.
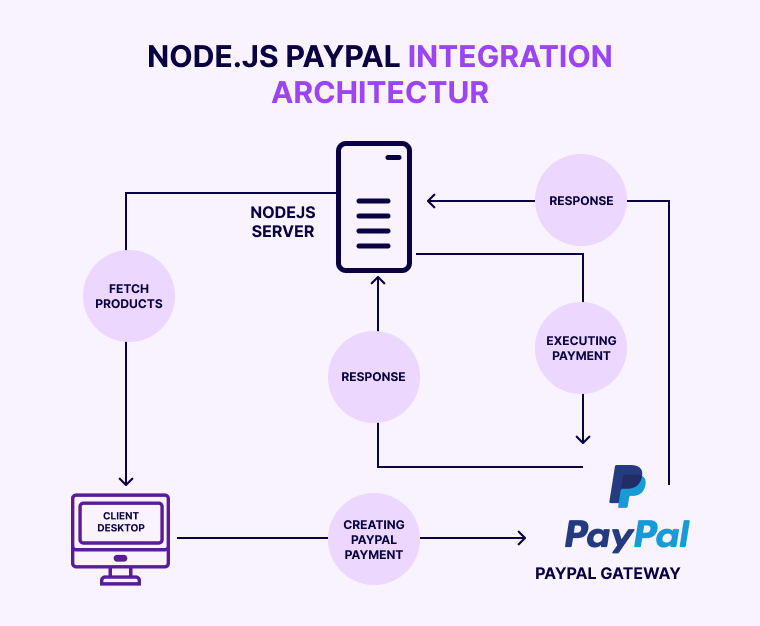
Here’s a breakdown of the process:
- The application gives you a glimpse of the products stored within the database.
- The application user chooses the product they intend to purchase and makes a payment against the purchase through the PayPal option.
- Upon making the payment using PayPal, the user will then be redirected to the URL for payment cancellations or payment success.
- On the server end, the server goes on to execute the payment made by performing a check on the status of the payment. A successful payment indicates payment approval.
Step 2: Creating a PayPal Application
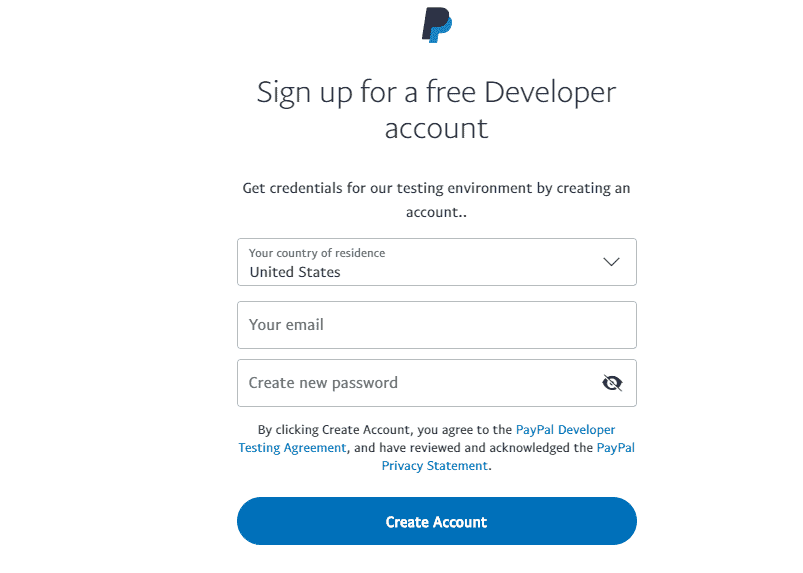
In a PayPal Node.js integration, the first thing you need is a PayPal application. This can be created by visiting developer.paypal.com.
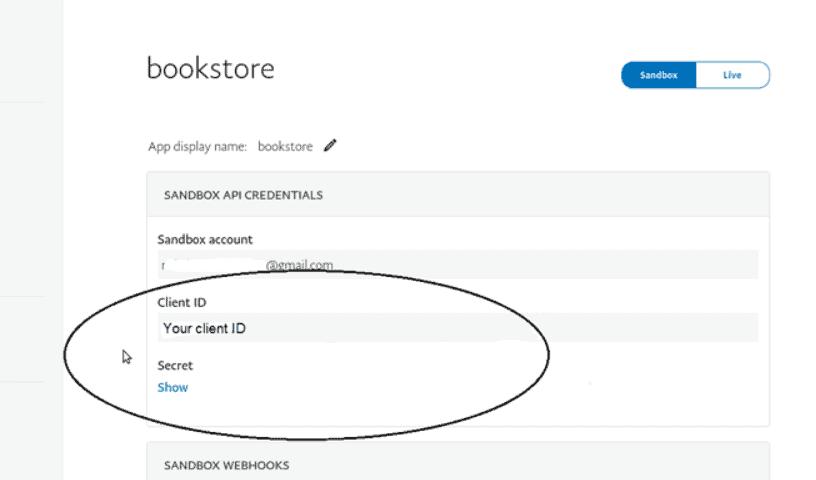
Once you have created the PayPal REST API Recurring Payment Integration application, you will be given a client ID and PayPal secret, of which both would be required in the application.
Just follow this guide to create the application:
- Log into the PayPal developer account to create a new application.
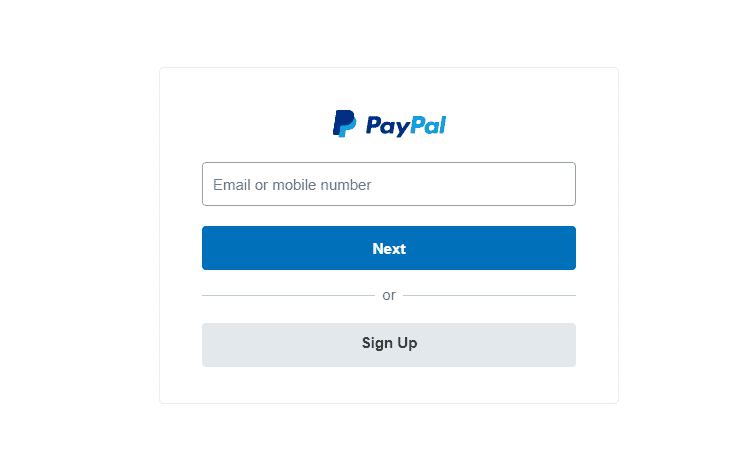
- If you don’t have an account on PayPal, you need to Sign Up and create a new account.
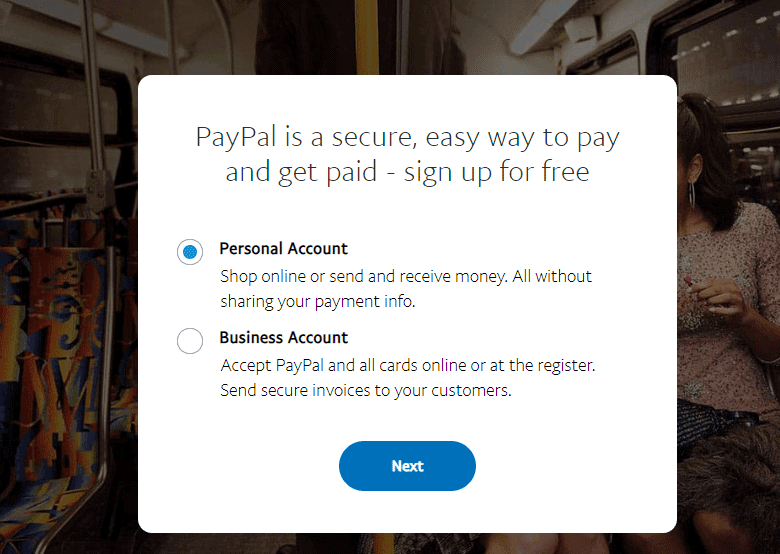
- In the Sign Up process, you need to select an individual or business account option.
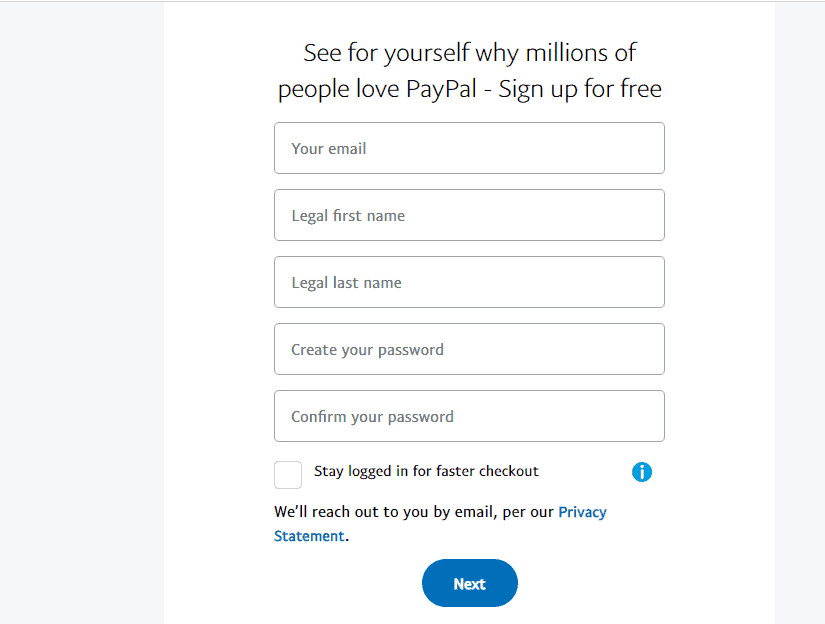
- Now, fill the necessary details for your account and click on the ‘Next’ button.
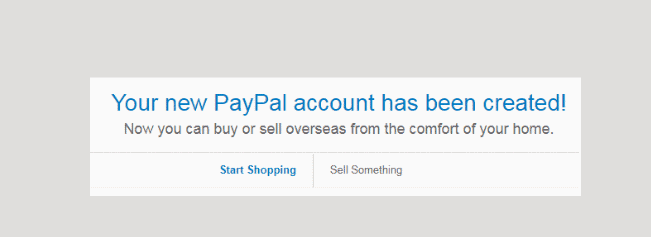
- After completing this step, you will be able to create a PayPal account with ease.
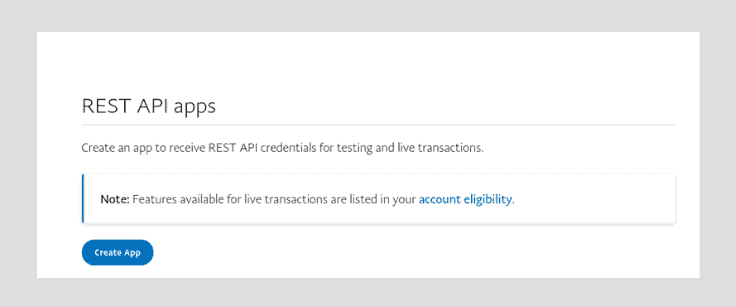
- Now, move to the dashboard of your PayPal Developer Account and search for Application under REST API section. You will see something like this:
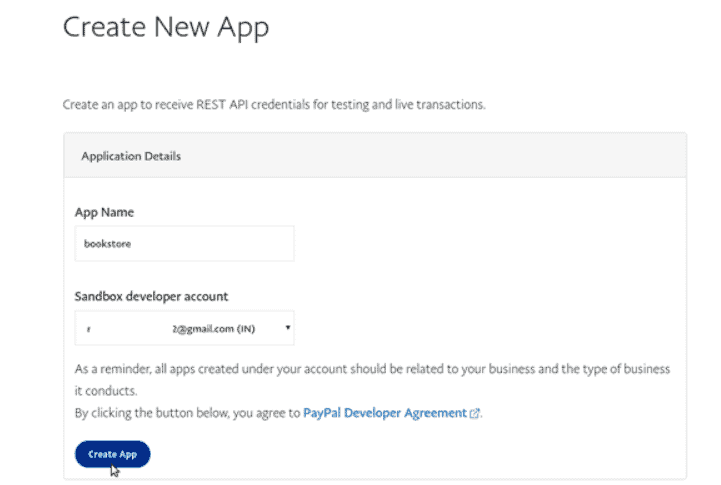
- Now, click on the ‘Create App’ button as shown below:
- Give a name for the application, choose the account, and click on the ‘Create App’ button.
- It’s now time to get the client ID and the secret click on the created application.
Step 3: PayPal Sandbox Test Account
In order to test the payments, PayPal Recurring Payments API offers you a test run called a sandbox. This is so you can test the application once created before going live with it. Here’s how you go about it:
- Go to the developer PayPal account to get your test credentials. Once you have it, click on the Accounts segment under the Sandbox dropdown to the left.
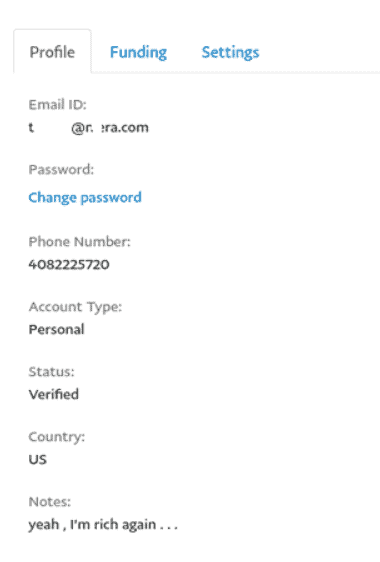
- You will be able to see the sandbox test account to the right. Click on buyer email and then on Profile to take a look at your profile.
- You can check the test balance by clicking on the Funding tab.
Step 4: Creating a MongoDB Collection
We need a database to store all the data in, which is where MongoDB comes in. We will have the three below-mentioned collections :
Users collection: Under this section, we will be storing the information of the users.
{

    "_id" : ObjectId("577af62ea8342f99d3452f81"),

    "name" : "Codershood",

    "email" : "[email protected]",

    "password" : "codershood"

}
Products collection: This segment will store different products’ data.
{

    "_id" : ObjectId("577af2eea8342f99d3452f7e"),

    "name" : "Google Nexus 6",

    "price" : 690.5000000000000000,

    "description" : "Android OS, v5.1.1 (Lollipop), planned upgrade to v6.0.1 (Marshmallow).1/2.4 sensor size, 1.1 µm pixel size, geo-tagging, touch focus, face detection, panorama, auto-HDR",

    "image" : "images/motox.jpg",

    "sku" : "sku-2123wers100",

    "createdAt" : ISODate("2015-02-05T01:23:42.201Z")

},

{

    "_id" : ObjectId("577af4dfa8342f99d3452f7f"),

    "name" : "Sandisk Cruzer Blade 16 GB Flash Pendrive",

    "price" : 4.50,

    "description" : "USB 2.0, 16 GB, Black & Red, Read 17.62 MB/sec, Write 4.42 MB/sec",

    "image" : "images/sandisk.jpg",

    "sku" : "sku-78955545w",

    "createdAt" : ISODate("2015-02-11T01:04:28.201Z")

},

{

    "_id" : ObjectId("577af53ba8342f99d3452f80"),

    "name" : "Prestige Pressure Cooker",

    "price" : 30.00,

    "description" : "Prestige Induction Starter Pack Deluxe Plus Pressure Cooker 5 L",

    "image" : "images/prestige.jpg",

    "sku" : "sku-90903034ll",

    "createdAt" : ISODate("2015-02-11T01:09:25.201Z")

}
Payments collection: This segment will store a user’s payment for later use.
Step 5: Folder Structure & Package.json
Before we begin with a project, let’s find out a little about the project folder structure. It is an important aspect of PayPal API Recurring Payments.
The PayPal NodeJS integration involves three vital folders – utils, views, node_modules.
Folder Structure:
+--- utils

|    +-- config.js

|    +-- db.js

|    +-- helper.js

|    +---routes.js

|

+--- node_modules

|     body-parser

|     ejs

|     express

|     express-session

|     mongodb

|     paypal-rest-sdk

|

+--- views

| css

||

|+-- bootstrap.min.css

|+-- style.css

| js

||

|+-- angular.min.js

|+-- script.js (Script for Login & Registration Page)

| pages

||

|+-- executePayement.ejs

|    +-- index.ejs

|    +-- home.ejs

|

+---server.js

+---package.json
In order to create a new PayPal Node.js, one can start with the command – npm init which will create a package.json file.
Package.json:
{

  "name": "Nodejs-Paypal-integration",

  "version": "0.0.1",

  "description": "Nodejs Paypal integration",

  "author": "Shashank",

  "license": "MIT",

  "dependencies": {

    "body-parser": "^1.15.2",

    "ejs": "^2.4.2",

    "express": "^4.14.0",

    "express-session": "^1.14.0",

    "mongodb": "^2.1.18"

  }

}
Step 6: Installing Node.js PayPal Integration Module
To install the PayPal Node.js integration, PayPal JavaScript API provides you with the REST API SDK through the below-mentioned command –
npm install paypal-rest-sdk
Step 7: Creating a Node.js Project
We have already created a package.json folder and checked out the folder structure. It’s not time to create the PayPal NodeJS integration application.
We start by creating config.js in the utils folder. This particular file will deal with express-related configuration.
Config.json:
"use_strict";

/*

* Creating Nodejs PayPal Integration application

* @author Shashank Tiwari

*/

const express = require("express");

const path= require('path');

const method=config.prototype;

function config(app){

    // Set .html as the default template extension

app.set('view engine', 'ejs');

// Initialize the ejs template engine

app.engine('html', require('ejs').renderFile);

// Tell express where it can find the templates

app.set('views', (__dirname + '/../views'));

// Make the files in the public folder available to the world

app.use(express.static(path.join('publicData')));

}

method.get_config=function(){

return this;

}

module.exports = config;
Create a db.js file inside the utils folder. This file will deal with database connection.
db.js:
"use_strict";

/*

* Creating Nodejs PayPal Integration application

* @author Shashank Tiwari

*/

/*requiring mongodb node modules */

const  mongodb=require('mongodb');

const MongoClient = mongodb.MongoClient;

const ObjectID = mongodb.ObjectID;

const assert = require('assert');

const MongoUrl='mongodb://localhost:27017/NodejsPaypal';

module.exports.onConnect = function(callback){

    MongoClient.connect(MongoUrl, function(err, db) {

assert.equal(null, err);

callback(db,ObjectID);

});

}
Now, go on and create a file called the server.js.
server.js:
use strict';

/*

* Creating Nodejs PayPal Integration application

* @author Shashank Tiwari

*/

/*requiring node modules starts */

const app = require("express")();

const http = require('http').Server(app);

/*requiring node modules ends */

/* requiring config file starts*/

const config =require('./utils/config.js')(app);

/* requiring config file ends*/

/* requiring config db.js file starts*/

const db = require("./utils/db.js");

require('./utils/routes.js')(app);

 http.listen(81,function(){

    console.log("Listening on http://127.0.0.1:81");

});
Step 8: Creating & Executing a PayPal Payment
To create and execute a PayPal payment, we need to –
Make a payment JSON Object for the PayPal Node.js integration.
PayPal payment:
const payment = {

    "intent": "authorize",

"payer": {

"payment_method": "paypal"

},

"redirect_urls": {

"return_url": "http://127.0.0.1:81/execute",

"cancel_url": "http://127.0.0.1:81/cancel"

},

"transactions": [{

"amount": {

"total": 90.00,

"currency": "USD"

},

"description": "PayPal payment description"

}]

};
Create another file called helper.js to perform CRUD operations on the database. This file also helps in carrying out PayPal operations such as creating payments and executing them.
Mentioned below are the codes that help with the functions:
isUserExists : function(data, callback){…=>
This function helps check where the users exist in the database.
insertPayment : function(data, callback){…=>
This function allows you to insert payments into the database.
getProductIndo : function(data, callback){…=>
This function fetches product information for you.
getAllProducts : function(data, callback){…=>
This function fetches information on all the products.
payNow : function(data, callback){…=>
This function helps in creating payments.
getResponse : function(data, callback){…=>
This function involves executing payments. It, therefore, needs a create payment response and a payer ID and returns a callback.
helper.js:
"use_strict";

/*

* Creating Nodejs PayPal Integration application

* @author ABC

*/

const Mongodb = require("./db");

const paypal = require('paypal-rest-sdk');

// paypal auth configuration

var config = {

  "port" : 5000,

  "api" : {

    "host" : "api.sandbox.paypal.com",

    "port" : "",

    "client_id" : "YOUR_CLIENT_ID",  // your paypal application client id

    "client_secret" : "YOUR_CLIENT_SECRET" // your paypal application secret id

  }

}

paypal.configure(config.api);


const self={

    isUserExists:function(data,callback){

    var response={};

Mongodb.onConnect(function(db,ObjectID){

db.collection('users').findOne(data,function(err, result){

if(result != null ){

response.process = "success";

response.isUserExists = true;

response.id = result._id;

response.name = result.name;

}else{

response.process = "failed";

response.isUserExists = false;

}

callback(response);

});

});

},

insertPayment:function(data,callback){

var response={};

Mongodb.onConnect(function(db,ObjectID){

db.collection('payments').insertOne(data,function(err, result) {

if(err){

response.isPaymentAdded = false;

response.message = "Something went Wrong,try after sometime.";

}else{

response.isPaymentAdded = true;

response.id=result.ops[0]._id;

response.message = "Payment added.";

}

callback(response);

});

});

},

getProductInfo:function(data,callback){

var response={};

Mongodb.onConnect(function(db,ObjectID){

data._id = new ObjectID(data._id);

db.collection('products').findOne(data,function(err, result){


if(result != null ){

response.error = false;

response.data = result;

}else{

response.error = true;

}

callback(response);

});

});

},

getAllProducts:function(data,callback){

Mongodb.onConnect(function(db,ObjectID){

db.collection('products').find().toArray(function(err, result){

callback(result);

db.close();

});

});

},

payNow:function(paymentData,callback){

var response ={};


/* Creating Payment JSON for Paypal starts */

const payment = {

"intent": "authorize",

"payer": {

"payment_method": "paypal"

},

"redirect_urls": {

"return_url": "http://127.0.0.1:81/execute",

"cancel_url": "http://127.0.0.1:81/cancel"

},

"transactions": [{

"amount": {

"total": paymentData.data.price,

"currency": "USD"

},

"description": paymentData.data.productName

}]

};

/* Creating Payment JSON for Paypal ends */

/* Creating Paypal Payment for Paypal starts */

paypal.payment.create(payment, function (error, payment) {

if (error) {

console.log(error);

} else {

    if(payment.payer.payment_method === 'paypal') {

    response.paymentId = payment.id;

    var redirectUrl;

    response.payment = payment;

    for(var i=0; i < payment.links.length; i++) {

    var link = payment.links[i];

    if (link.method === 'REDIRECT') {

    redirectUrl = link.href;

    }

    }

    response.redirectUrl = redirectUrl;

    }

    }

    /*

    * Sending Back Paypal Payment response

    */

    callback(error,response);

});

/* Creating Paypal Payment for Paypal ends */

},

getResponse:function(data,PayerID,callback){

var response = {};

const serverAmount = parseFloat(data.paypalData.payment.transactions[0].amount.total);

const clientAmount = parseFloat(data.clientData.price);

const paymentId = data.paypalData.paymentId;

const details = {

"payer_id": PayerID

};

response.userData= {

userID : data.sessionData.userID,

name : data.sessionData.name

};

if (serverAmount !== clientAmount) {

response.error = true;

response.message = "Payment amount doesn't matched.";

callback(response);

} else{

paypal.payment.execute(paymentId, details, function (error, payment) {

if (error) {

console.log(error);

response.error = false;

response.message = "Payment Successful.";

callback(response);

} else {

/*

* inserting paypal Payment in DB

*/

const insertPayment={

    userId : data.sessionData.userID,

    paymentId : paymentId,

    createTime : payment.create_time,

    state : payment.state,

    currency : "USD",

    amount: serverAmount,

    createAt : new Date().toISOString()

}

 self.insertPayment(insertPayment,function(result){

if(! result.isPaymentAdded){

response.error = true;

response.message = "Payment Successful, but not stored.";

callback(response);

}else{

response.error = false;

response.message = "Payment Successful.";

callback(response);

};

});

};

});

};

    }

}

module.exports = self;
Now that we’ve taken a look at the functions, we consider the routes for the application. You need to create a routes.js file in the utils folder.
routes.js:
'use strict';

const bodyParser = require('body-parser');

var Session = require('express-session');

var Session = Session({

    secret:'secrettokenhere',

    saveUninitialized: true,

resave: true

});

const helper = require('./helper');

var method=routes.prototype;

function routes(app){

app.use(bodyParser.json());

app.use(bodyParser.urlencoded({

extended: true

}));

app.use(Session);

var sessionInfo;

/*

    * Rendering login page

    */

app.get('/', function(req, res){

sessionInfo = req.session;

if (typeof sessionInfo.sessionData == "undefined" || sessionInfo.sessionData=="") {

res.render("index");

}else{

res.redirect("/home");

res.end();

}

});

/*

    * performing login operation

    */

app.post('/login', function(req, res){

sessionInfo = req.session;

const regEx = /^(([^<>()[].,;:s@"]+(.[^<>()[].,;:s@"]+)*)|(".+"))@(([[0-9]{1,3}.[0-9]{1,3}.[0-9]{1,3}.[0-9]{1,3}])|(([a-zA-Z-0-9]+.)+[a-zA-Z]{2,}))$/;

const email = req.body.email;

const password = req.body.password;

var response = {};

if(! regEx.test(email)){

response.process = false;

response.message = "Enter valid Email.";

res.writeHead(200, {'Content-Type': 'text/plain'});

res.end(JSON.stringify(result));

}else{

const data={

"email" : req.body.email,

"password" : req.body.password

}

helper.isUserExists(data,function(result){

if(result.isUserExists === true){

/*

* Storing data into Session

*/

sessionInfo.sessionData = {

userID:result.id,

name:result.name,

};

}

res.writeHead(200, {'Content-Type': 'text/plain'});

res.end(JSON.stringify(result));

});

}

});

app.get('/home',function(req, res){

sessionInfo = req.session;

if (typeof sessionInfo.sessionData == "undefined" || sessionInfo.sessionData=="") {

res.redirect("/");

res.end();

} else{

var response ={};

    const data={

_id : sessionInfo.sessionData.userID

};

/*

* Fetching products and showing onto home page

*/

helper.getAllProducts(data,function(products){

response.products = products;

response.userData = {

name : sessionInfo.sessionData.name

};

res.render('home',{

response : response

});

});

}

});

app.post('/paynow',function(req, res){

sessionInfo = req.session;

if (typeof sessionInfo.sessionData == "undefined" || sessionInfo.sessionData=="") {

res.redirect("/");

res.end();

} else{

const data ={

userID : sessionInfo.sessionData.userID,

data : req.body

}

/*

* call to paynow helper method to call paypal sdk

*/

helper.payNow(data,function(error,result){

if(error){

res.writeHead(200, {'Content-Type': 'text/plain'});

res.end(JSON.stringify(error));

}else{

sessionInfo.paypalData = result;

sessionInfo.clientData = req.body;

res.redirect(result.redirectUrl);

}

});

}

});

/*

* payment success url

*/

app.get('/execute',function(req, res){

sessionInfo = req.session;

var response = {};

const PayerID = req.query.PayerID;

if (typeof sessionInfo.sessionData == "undefined" || sessionInfo.sessionData=="") {

res.redirect("/");

res.end();

} else{

sessionInfo.state ="success";

helper.getResponse(sessionInfo,PayerID,function(response) {

res.render('executePayement',{

response : response

});

});

};

});

/*

* payment cancel url

*/

app.get('/cancel',function(req, res){

sessionInfo = req.session;

if (typeof sessionInfo.sessionData == "undefined" || sessionInfo.sessionData=="") {

res.redirect("/");

res.end();

} else{

var response ={};

response.error = true;

response.message = "Payment unsuccessful.";

response.userData = {

name : sessionInfo.sessionData.name

};

res.render('executePayement',{

response : response

});

}

});


app.get('/logout',function(req, res){

req.session.sessionData = "";

res.redirect("/");

});

}

method.getroutes=function(){

return this;

}

module.exports = routes;
Step 9: Creating Front-End Files
We have successfully created the backend. It’s time to create the front-end files, making use of EJS to templating.
You need to create three files – index.ejs, home.ejs, executePayment.ejs.
index.ejs is used in the login operation
index.ejs:
<html>

<head>

    <title>Paypal Nodejs Integration : www.codershood.info</title>

    <link rel="stylesheet" href="css/bootstrap.min.css">

    <link rel="stylesheet" href="css/font-awesome.min.css">

    <link rel="stylesheet" href="css/style.css">

</head>

<body ng-app="Login" ng-controller="LoginController" class="loginContainer">

    <div class="container">

        <div class="row">

            <h2>Login</h2>

            <label >Username:</label>

            <input type="text" class="form-control" ng-model="email" name="email" placeholder="Enter your email">

            <br/>

            <label >Password:</label>

            <input type="password" class="form-control" ng-model="password" name="password" placeholder="Enter your password">

            <br/>

            <button class="btn " ng-click="Login()">Login</button>

        </div>

    </div>

    <script src = "js/angular.min.js"></script>

    <script src = "js/script.js"></script>

</body>

</html>
Home.ejs is created to render the products for users to see.
home.ejs:
<html>

<head>

    <title>Paypal Nodejs Integration : www.codershood.info</title>

    <link rel="stylesheet" href="css/bootstrap.min.css">

    <link rel="stylesheet" href="css/font-awesome.min.css">

    <link rel="stylesheet" href="css/style.css">

</head>

<body class="container">

    <div class="row">

        <div class="header">

            <div class="col-md-4">

                Hello <%= response.userData.name %>

            </div>

            <div class="col-md-8">

                <ul class="navigator">

                    <li>

                        <a href="/home" title="Home">

                            <i class="fa fa-home" aria-hidden="true"></i>

                        </a>

                    </li>

                    <li>

                        <a href="/logout" title="Logout">

                            <i class="fa fa-sign-out" aria-hidden="true"></i>

                        </a>

                    </li>

                </ul>

            </div>

        </div>

    </div>

    <div class="row productContainer">

            <% response.products.forEach(function(products) { %>

                <div class="col-md-12 product">

                    <div class="col-md-4">

                        <img height="200" width="150" src="<%= products.image %>">

                    </div>

                    <div class="col-md-8">

                        <div class="col-md-8">

                            <h3 class="productName"><%= products.name %></h3>

                        </div>

                        <div class="col-md-4">

                            <h3 class="productPrice"><%= products.price %> USD</h3>

                        </div>

                        <div class="col-md-12">

                            <p class="productDescription" ><%= products.description %></p>

                            <form class="form-horizontal" role="form" id="paypalForm" method="post" action="/paynow">

                                <input type="hidden" value="<%= products.price %>" name="price"/>

                                <input type="hidden" value="<%= products._id %>" name="productId"/>

                                <input type="hidden" value="<%= products.name %>" name="productName"/>

                                <button class="btn submitBtn">Buy Now</button>

                            </form>

                        </div>

                    </div>

                </div>


            <% }); %>

        </div>

</body>

</html>
executePayement.ejs is to give the users a response when they return from the PayPal site in order to let them know whether the payment was successful or a failed attempt.
executePayement.ejs:
<html>

<head>

    <title>Paypal Nodejs Integration : www.codershood.info</title>

    <link rel="stylesheet" href="css/bootstrap.min.css">

    <link rel="stylesheet" href="css/font-awesome.min.css">

    <link rel="stylesheet" href="css/style.css">

</head>

<body>

    <div class="header">

        <div class="col-md-4">

            Hello <%= response.userData.name %>

        </div>

        <div class="col-md-8">

            <ul class="navigator">

                <li>

                    <a href="/home" title="Home">

                        <i class="fa fa-home" aria-hidden="true"></i>

                    </a>

                </li>

                <li>

                    <a href="/logout" title="Logout">

                        <i class="fa fa-sign-out" aria-hidden="true"></i>

                    </a>

                </li>

            </ul>

        </div>

    </div>

    <div class="container">

        <div class="row PaymentInfoCard">

            <div class="col-md-12">

                <div class="alert <% if(response.error) { %> alert-danger <% } else{ %> alert-success <% } %>">

                    <strong> <%= response.message %></strong>

                </div>

            </div>

        </div>

    </div>

</body>

</html>
A Guide to Express Checkout With Braintree & Node.js
Here’s a guide to Express Checkout wit Braintree and Node.js:
Starting Up
Express Checkout allows a streamlined checkout process, ensuring that your customers remain on your site throughout the payment procedure while reducing the number of steps involved in the checkout process.
This is specifically designed for those merchants who do not have a merchant account to process direct credit card payments.
Within this checkout process, customers can choose the payment mode and the shipping address while using Express Checkout.
Upon receiving authorization to process the PayPal transaction, the buyers are brought back to your site to finalise the order.
The Braintree SDK offers an easy checkout experience to your customers through a simple developer integration:
- The client SDK that helps in collecting payment details
- The server SDK that helps in managing every PayPal request
Setting Up The Client
Braintree’s JavaScript SDK allows you to accept PayPal payments with ease. This involves varied components, of which you can select the ones that you need.
Loading of the SDK
The JavaScript SDK components can be loaded directly from the server.
<!-- Load the required checkout.js script -->

<script src="https://www.paypalobjects.com/api/checkout.js" data-version-4></script>

 <!-- Load the required Braintree components. -->

<script src="https://js.braintreegateway.com/web/3.39.0/js/client.min.js"></script>

<script src="https://js.braintreegateway.com/web/3.39.0/js/paypal-checkout.min.js"></script>

 <script>

paypal.Button.render({

  braintree: braintree,

  // Other configuration

}, '#id-of-element-where-paypal-button-will-render');

</script>
Getting a client token
The JavaScript SDK requires server-generated client token.
paypal.Button.render({

  braintree: braintree,

  client: {

    production: 'CLIENT_TOKEN_FROM_SERVER',

    sandbox: 'CLIENT_TOKEN_FROM_SERVER'

  },

  env: 'production', // or 'sandbox'

  // The rest of your setup, we'll go into more detail about this later on
PayPal configuration
By coding the flow to ‘checkout’, you can ensure a one-time payment request. Make sure you also mention the amount and currency.
paypal.Button.render({

  braintree: braintree,

  client: {

    production: 'CLIENT_TOKEN_FROM_SERVER',

    sandbox: 'CLIENT_TOKEN_FROM_SERVER'

  },

  env: 'production', // Or 'sandbox'

  commit: true, // This will add the transaction amount to the PayPal button

  payment: function (data, actions) {

    return actions.braintree.create({

      flow: 'checkout', // Required

      amount: 10.00, // Required

      currency: 'USD', // Required

      enableShippingAddress: true,

      shippingAddressEditable: false,

      shippingAddressOverride: {

        recipientName: 'Scruff McGruff',

        line1: '1234 Main St.',

        line2: 'Unit 1',

        city: 'Chicago',

        countryCode: 'US',

        postalCode: '60652',

        state: 'IL',

        phone: '123.456.7890'

      }

    });

  },

  onAuthorize: function (payload) {

    // Submit `payload.nonce` to your server.

  },

}, '#paypal-button');
Send payment method nonce to server
Braintree receives the customer payment information through the client-side and offers payment method nonce in exchange. This payment method is used on your server to create secure transactions.
Setting Up the Server
Installation and Configuration
Install the Braintree node package
npm install braintree
Construct the Gateway Object
You must first construct a gateway object with the environment-specific access token in your PayPal dashboard.
var gateway = braintree.connect({

  accessToken: useYourAccessToken

});
Generate a Client Token
Your server has the responsibility to generate client tokens which include every authorisation and configuration information needed by the client to initialise the communication of client SDK with Braintree.
app.get("/client_token", function (req, res) {

  gateway.clientToken.generate({}, function (err, response) {

    res.send(response.clientToken);

  });

});
Receive payment method nonce from the client
A successful checkout by a customer will lead to your client receiving a payment method nonce, which is then sent to the server to create a transaction.
app.post("/checkout", function (req, res) {

  var nonce = req.body.payment_method_nonce;

  // Use payment method nonce here

});
Create a transaction
This can be done using the payment method nonce and the amount. You would have to enter the specific currency and the valid shipping address.
var gateway = braintree.connect({

  accessToken: useYourAccessToken

});

var saleRequest = {

  amount: req.body.amount,

  merchantAccountId: "USD",

  paymentMethodNonce: req.body.nonce,

  orderId: "Mapped to PayPal Invoice Number",

  descriptor: {

    name: "Descriptor displayed in customer CC statements. 22 char max"

  },

  shipping: {

    firstName: "Jen",

    lastName: "Smith",

    company: "Braintree",

    streetAddress: "1 E 1st St",

    extendedAddress: "5th Floor",

    locality: "Bartlett",

    region: "IL",

    postalCode: "60103",

    countryCodeAlpha2: "US"

  },

  options: {

    paypal: {

      customField: "PayPal custom field",

      description: "Description for PayPal email receipt"

    },

    submitForSettlement: true

  }

};

 gateway.transaction.sale(saleRequest, function (err, result) {

  if (err) {

    res.send("<h1>Error:  " + err + "</h1>");

  } else if (result.success) {

    res.send("<h1>Success! Transaction ID: " + result.transaction.id + "</h1>");

  } else {

    res.send("<h1>Error:  " + result.message + "</h1>");

  }

});
Test to Go Live
You can test the integration using the access token for Braintree sandbox generated in the PayPal Developer Dashboard.
Once the integration has been tested, you can go live using the following actions –
Live configuration
- Click on Access Token Page
- Request for credentials
- Update the access token
Run a transaction test in production
- Carry out a test with low-value transactions on the production account
- Confirm if the funds have been deposited
Conclusion
The above step-by-step guide gives one a detailed understanding and tutors them to successfully write a PayPal NodeJS code, fulfilling the objective of helping them script the application and integrating a Paypal NodeJS Recurring Payments API.
We hope you had a great time reading this article and it proves to be a wonderful experience and you can hire Node.js developer who helps you to integrate PayPal in the apps.
-
How Node.js Improved PayPal Request Handling?
With the help of Node.js, PayPal developers were able to write browser and server-side code with just one platform. So, the team was able to address the problems in a quicker way. This way the request handling got improved.
-
How Node.js Changed PayPal Request Handling?
With Node.js coming into the picture, the single-threaded event model with an asynchronous approach started to take effect. PayPal was able to remain available for a longer period. So, in this manner, requests were handled.
-
Since How Long PayPal Has Switched To Node.js?
Way back since 2012, PayPal is utilizing Node.js. In the initial period, it was utilized as a prototype mechanism. But, in recent years, it has become a core part of its architecture. So, the role and importance are greater now.
-
How To Authorize A PayPal Payment?
To authorize a payment, create a payment, and set the intent to authorize. It will authorize the PayPal Payment and if the request is successful, you will get a response with all the payment information as well.

